🔥 The Persistence Problem
Every Node.js application works with data. We write code to save, get, update, and delete information. Often, we do this directly with databases using tools like ORMs or raw queries. This direct way might seem good for small projects. But as your application grows, it quickly brings many problems:
- 🔗 Code is Stuck Together: Your business logic becomes too connected to your database details (like SQL, NoSQL, or specific ORM code). If you change your database setup or switch ORMs, you might need to change many parts of your code. This takes a lot of work.
- 🧪 Hard to Test: How do you test your main business rules if they directly call
User.find()ordb.collection('products').insert()? You either need a real database (which is slow and needs test data) or you have to create complex mocks for your database calls, making tests harder to write and maintain. - ♻️ Repeated Code: You might write the same database filters (
WHEREclauses) or data changes in many places. This can cause mistakes and makes it hard to change things everywhere. - 🤯 Confusing Logic: When database code is spread out, your main business rules get hidden. This makes the code harder to read, understand, and maintain for new team members.
- 🤸 Less Flexible: Do you want to add caching, use a different data source, or change how you handle deleted items? Without a clear way to separate things, these changes become difficult and risky.
These are common problems when your data layer is not well-organized. They slow down development, increase bugs, and make your codebase hard to work with.
Luckily, there is a well-known way to solve these issues: the Repository Pattern.
💡 What is the Repository Pattern?
Imagine your application's main logic (your "business rules") needs to work with data, but it doesn't want to know how that data is saved or loaded. It just wants to ask for data in a simple, clear way. This is exactly what the Repository Pattern helps us achieve.
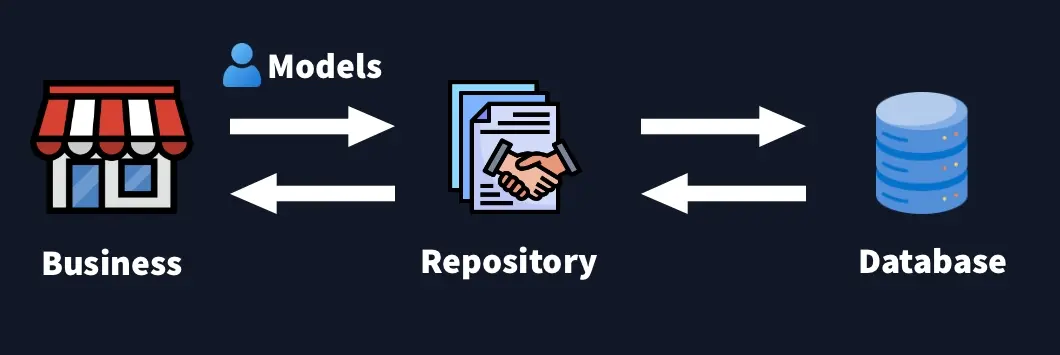
At its heart, the Repository Pattern acts as a middle layer between your business logic and your data layer. Your application asks the repository for data using clear, domain-focused methods — and the repository handles the details of talking to the database.
Let’s break down what makes this pattern so valuable:
- 🔗 Decouple your code: Your business logic doesn’t need to care whether you’re using MongoDB, PostgreSQL, or an ORM like Prisma or Sequelize. The repository hides those details.
- 🧪 Improve testability: Since your code depends on an interface, not an actual database, you can mock or fake your repositories in unit tests with ease.
- 🧼 Enhance maintainability: All your data access logic lives in one place. If you need to change a query or how you store data, you only need to change the repository.
- 🔄 Increase flexibility: Want to switch databases later? Or introduce caching? Just replace the repository implementation — your business logic stays the same.
- 🎯 Focus on your domain: Your repositories can expose meaningful, expressive methods like
findActiveUsers()orgetOrdersPlacedLastMonth(), keeping your domain logic clean and readable.
Note
The Repository Pattern became popular as part of Domain-Driven Design (DDD). DDD is a way of building software that focuses on the core business problems. The pattern helps keep your "domain objects" (the objects that represent your business concepts, like a User or Product) clean and unaware of how they are saved.
⚖️ Repository vs. DAO: What's the Difference?
When talking about data access, you might also hear about the Data Access Object (DAO) pattern. Both DAOs and Repositories help you work with data, but they do it in different ways and at different levels. Understanding their differences is key to choosing the right tool for your needs.
🗄️ Data Access Object (DAO)
A DAO is a pattern that focuses on direct interaction with your database.
- 🎯 Purpose: Its main job is to perform basic Create, Read, Update, Delete (CRUD) operations on a single table or entity in the database.
- ↩️ What it Returns: A DAO often returns raw data (like database rows), simple data transfer objects (DTOs), or objects that are very specific to your ORM or database library. It's very close to the database structure.
- 🪜 Level of Abstraction: It works at a lower level, meaning it knows a lot about the database tables, columns, and SQL queries.
Think of a DAO as a direct translator between your application and a specific database table.
📝 Repository Pattern
As we've discussed, the Repository Pattern has a different goal:
- 🎯 Purpose: It acts like a collection of your domain objects. It hides how data is saved or loaded, letting your business logic work with rich, meaningful objects (like a
Userobject with methods, not just raw user data). - ↩️ What it Returns: A Repository always returns domain objects (or aggregates of domain objects). It focuses on what your business needs, not just what's in a database table.
- 🪜 Level of Abstraction: It works at a higher level, closer to your business domain. It doesn't know about database tables or SQL; it knows about
Users,Products, orOrders.
While a DAO is useful for simple data operations, the Repository Pattern is better when you want to build applications with complex business logic that is completely separate from database details. You might even use a DAO inside a Repository implementation, but your business logic would only ever see the Repository.
👩💻 Implementing the Repository Pattern in Node.js
Now, let's get practical. How do we actually build a Repository Pattern in a Node.js application? The key is to start by defining what our repositories will do, without worrying about how they will do it. This is where interfaces come in.
Note
In this implementation, we are going to use the Hexagonal Architecture (also known as Ports and Adapters). This architecture helps us clearly separate our core business logic and use cases from external concerns like databases (infrastructure) and user interfaces. The Repository Pattern is a perfect fit for Hexagonal Architecture, as it defines a "port" for data persistence. However, you can combine the Repository Pattern with other architectures that also aim to separate business logic from infrastructure.
📝 Defining the Repository Interface (Contract)
First, let's imagine we have our core domain object, User. This User class represents a user in our business logic. It holds data and can have methods that define its behavior (like activating an account). Importantly, this User class knows nothing about databases or how it's saved.
Now that we have our User domain object, we need a way for our application to save and retrieve User objects without knowing the database details. This is where the Repository Interface comes in.
The repository interface defines the "contract" for how we will interact with User objects in our persistence layer. In TypeScript, we use interface for this. Any class that wants to be a UserRepository must follow this contract and implement all its methods.
This contract is crucial because:
- 🤝 It creates a clear agreement: Any part of your application that needs to use a
UserRepositoryknows exactly what methods are available (e.g.,save,findById,findActiveUsers). - ♻️ It enables decoupling: Your business logic will depend only on this interface, not on the specific database implementation (like a PostgreSQL or MongoDB version).
- 🧪 It makes testing easy: You can create a "fake" version of this interface for your tests, as we discussed earlier.
Important Note on Specificity:
Remember, repositories should be specific to your domain objects. Instead of a generic Repository<T>, we create interfaces like UserRepository or ProductRepository. This makes the purpose of each repository very clear and allows for domain-specific methods.
Here's the UserRepository interface:
In this setup, our User class is pure domain logic, and UserRepository defines how we interact with User objects for persistence. By starting with this interface and a rich domain class, we set up a strong foundation for a decoupled and testable application. Next, we'll see how to create a real database implementation that follows this contract.
🎨 Creating Concrete Implementations
After defining our UserRepository interface, the next step is to create a "concrete implementation." This is a class that actually connects to a database (like MongoDB, PostgreSQL, or a simple in-memory storage for testing) and performs the real data operations.
This concrete class must implement all the methods defined in our UserRepository interface. This means it promises to provide the actual code for save, findById, delete, and findActiveUsers.
Key Idea: This is the only place where database-specific code should live. Your business logic will never directly call your database client; it will always go through this repository implementation.
For our example, let's create a simple InMemoryUserRepository. In a real application, you would replace this with a class that uses a database client (like Mongoose for MongoDB, Prisma for SQL databases, or a direct pg client for PostgreSQL). The InMemoryUserRepository is great for understanding the pattern and for writing fast tests.
As you can see, the InMemoryUserRepository class provides the actual logic for each method defined in the UserRepository interface. In our case, the save method intelligently handles both creating new users and updating existing ones based on their id to keep a simpler contract, but if you prefer you can split that in two methods. It handles the "how" of data storage, while the interface only defines the "what."
This separation is powerful. If we later decide to use a PostgreSQL database, we would create a PostgresUserRepository class that also implements UserRepository, but its methods would contain SQL queries or ORM calls instead of array operations. Our business logic would not need to change at all!
Next, we'll see how to use this repository in our application's business logic.
💼 Integrating with Your Business Logic
The whole point of the Repository Pattern is to make your business logic clean and independent of how data is stored. Your application's specific operations (often called "Use Cases") should only know about the UserRepository interface, not the InMemoryUserRepository or any future PostgresUserRepository.
This concept is called Dependency Injection (DI). Instead of an operation class creating its own repository, the repository is "injected" (passed in) to the class. This makes your operations easy to test and flexible.
Let's create a dedicated ActivateUserUseCase class. This class will handle the specific business logic for activating a user. It will depend on our UserRepository interface.
Now, let's see how you would "wire up" these pieces in your main application file (e.g., app.ts or main.ts).
In this setup:
- Each specific business operation (like
ActivateUserUseCase) is its own class. - These "use case" classes depend only on the
UserRepositoryinterface. - The
mainfunction (or your application's entry point) is responsible for creating the specificInMemoryUserRepositoryand passing it to each use case. This is the "composition root" where dependencies are assembled.
This clear separation ensures that your business logic remains pure, testable, and easily adaptable to changes in your data persistence layer, with each operation clearly defined.
🎒 Note on Dependency Management: In this example, we are manually creating and passing dependencies (like
new ActivateUserUseCase(userRepository)). This is fine for small projects. But, in a more medium-large Node.js application, you would typically delegate this task to a Dependency Injection (DI) container. Tools like Awilix, InversifyJS, or the built-in DI system in frameworks like NestJS can automatically manage the creation and injection of these dependencies, making your application setup much cleaner and more scalable.
🚒 Potential Drawbacks and When to Reconsider
The Repository Pattern is powerful, but like any architectural choice, it comes with its own set of trade-offs. It's important to understand these so you can decide if it's the right fit for your project.
🧠 Increased Complexity and Boilerplate
Adding the Repository Pattern means introducing more files (interfaces, concrete implementations) and more layers to your application. For very small or simple applications, this extra structure might feel like "boilerplate" – code you have to write that doesn't immediately seem to add value.
- 💸 Cost: More files and layers can mean a slightly steeper learning curve for new team members and more code to navigate.
- 🌟 Benefit: This "cost" often pays off in larger, more complex applications by making them much easier to manage in the long run.
🧨 Overhead for Simple CRUD Applications
If your Node.js application is mostly a simple "CRUD" (Create, Read, Update, Delete) wrapper around a database, where you're just saving and retrieving data without much complex business logic, the Repository Pattern might be overkill.
- ⚠️ When to Reconsider: For applications that are just displaying data directly from the database with minimal transformations, the direct use of an ORM or even raw queries might be simpler and faster to develop.
- ✅ When it's Worth It: The more complex your business rules become, and the more you need to ensure testability and flexibility, the more valuable the Repository Pattern becomes.
📚 Learning Curve
For developers new to Domain-Driven Design (DDD) or architectural patterns, understanding and correctly implementing the Repository Pattern can take some time.
- 🤝 Team Readiness: Consider your team's experience. A pattern is only useful if your team can understand and maintain it effectively.
In summary, while the Repository Pattern offers significant advantages for building robust and maintainable Node.js applications, it's a strategic investment. Evaluate your project's complexity, team's expertise, and specific data access needs to determine if and where this pattern will provide the most value.
✨ Conclusion
We've journeyed through the Repository Pattern in Node.js, from understanding its core purpose to seeing how it's implemented and integrated into an application.
To recap, the Repository Pattern is a powerful tool that helps you:
- 🔗 Decouple your code: Separate your business logic from database details.
- 🧪 Improve testability: Easily test your core logic without a real database.
- 🔧 Enhance maintainability: Centralize data access, making changes simpler and safer.
- 🤸 Increase flexibility: Prepare your application for future changes in database technology.
- 🎯 Focus on your domain: Keep your business objects clean and expressive.
While it adds a layer of abstraction, the benefits for medium to large-sized Node.js applications with complex business logic are significant. It's an investment in a cleaner, more robust, and more adaptable codebase. Remember to consider your project's specific needs and complexity before fully adopting it.
I hope this post has helped you understand the Repository Pattern better and shown you how to apply it in your Node.js projects.
Thanks for reading! 🙌