✨ Introduction
Publishing a new version of an npm library seems simple, but doing it correctly involves many steps. Each time you release, you need to take care of several important tasks:
- 🏷️ Creating a new Git tag with the right version number.
- 📝 Updating the changelog file so everyone knows what has changed.
- Making sure the version number in your
package.jsonfile is correct. - Publishing the new version to the npm registry.
- Creating a GitHub release with clear release notes.
If you do these steps manually, it's very easy to make mistakes or forget something important. And if you release new versions often, repeating these steps again and again can become boring and take a lot of time.
Luckily, we don't have to do all of this by hand anymore! 🙌
There are smart tools that can automate the entire release process for you.
In this post, we'll show you how easy it is to set up one of these tools and take away all the pain from releasing your npm library. Let's start! ✨
🧾 Conventional Commits
Before we can automate our releases, we need to understand the foundation of this automation: Conventional Commits. It's a simple set of rules for how to write your git commit messages.
Why do we use them?
- 👨💻 For humans: Your commit history becomes super clear and easy to read for you and your team. You can quickly understand what each change does.
- 🤖 For machines: This special format allows automated tools to understand your changes. For example, a tool can see if you added a new feature or fixed a bug, and then use that information to create release notes or update your app's version number automatically.
📝 The Format
Conventional Commits follow a simple, structured way of writing messages:
Let's break down each part:
<type> – This tells you what kind of change you made.
feat:✨ A new feature for the application.fix:🐛 A bug fix that solves a problem.docs:📚 Changes only to documentation (like README files or guides).style:💄 Changes that do not affect code logic, like formatting, semicolons, or whitespace.refactor:♻️ A code change that improves structure but doesn't add a feature or fix a bug.test:🧪 Adding new tests or correcting existing ones.chore:🔧 Regular maintenance tasks that don't affect the app's code directly (e.g., updating dependencies, build process changes).
[optional scope] – This is a small, optional word or phrase that tells you which part of the codebase was affected by the change. It helps to categorize the change more specifically.
<description> – A short summary of the change (lowercase, no period at the end)
☀️ Real-World Examples
Let's see some examples of how these commits look in practice:
Simple Changes (Type + Description):
Changes with a Scope (Type + Scope + Description):
Breaking Changes (Type + ! + Description):
When a change is breaking (meaning it might cause other parts of the code or other projects to stop working), you add an exclamation mark (!) after the type/scope.
Commits with a Body and Footer: For more details, you can add an optional body (a longer explanation) and footers (like linking to an issue).
By using this format, your git history becomes a powerful tool for both humans and automation!
🚀 Release-Please
Release-please is a powerful automation tool created by Google that transforms how you handle releases. The magic happens through conventional commits. Release-please reads your commit messages, understands what type of changes you've made (features, bug fixes, breaking changes), and generates everything you need for a professional release.
🤩 Why Release-Please Stands Out
What makes release-please truly special is not just that it automates things, but its great flexibility and wide support.
🌍 Multi-language Support – It works with almost any programming language and project type you can imagine:
- Node.js projects (with
package.json) - Python projects (with
pyproject.tomlorsetup.py) - Ruby projects (with
version.rb) - Rust projects (with
Cargo.toml) - ☕ Java/Maven projects (with
pom.xml) - Go projects (with
CHANGELOG.md) - PHP projects (with
composer.json) - And many more, including Dart, Elixir, Helm, Terraform, R... and continuously adding support for new languages and tools
🏢 Enterprise-Ready Features: – It has powerful features for bigger companies and complex projects:
- 📁 Monorepo Support – Manage releases for many different packages inside a single large repository.
- 🌿 Release Branches – It can handle different versions of your software at the same time (like
1.x,2.x,3.xbranches). This is optional; for simpler setups, you can manage all your releases directly from yourmainbranch.
🛠️ CI/CD Flexibility – Release-please is a standalone command-line tool (CLI). This means you can use it with almost any Continuous Integration/Continuous Delivery (CI/CD) system:
- GitHub Actions (this is the most common way to use it)
- GitLab CI/CD pipelines
- Azure DevOps workflows
- Jenkins jobs
- Bitbucket Pipelines
- Or any other CI system that can run simple command-line commands.
👥 The Perfect Solution for Modern Teams
What I love most about release-please is that it's not tied to any specific company or tool. Unlike some other tools that force you to use certain platforms or languages, release-please works with your existing setup:
- 🔓 Not Coupled to Any CI System – You can move between different CI platforms without having to change your release process.
- 🌐 Language Agnostic – Use the same tool for all your projects, no matter which programming language they use.
- 📈 Scales with Complexity – It works perfectly for both small, simple libraries and large, complex monorepos.
- 🌿 Flexible Branching – It supports any branching strategy your team prefers.
Because of all this support, release-please is an ideal solution for companies that use many different technologies, have multiple teams, or need complex ways to release their software. You learn it once, and it works everywhere!
In the next sections, we'll see exactly how this automation works and how to set it up for your projects.
🪄 Setting Up Automatic Releases
Now that we understand what release-please is and why it's so powerful, let's go step-by-step through how to set it up in a real project.
In this guide, we will configure release-please to automatically manage releases for a Node.js library. This library will be published to npm, and we will use GitHub Actions as our CI/CD platform.
Creating an npm Token
Before we can publish our library to the npm registry, we need to generate an npm access token that will be used by our CI workflow.
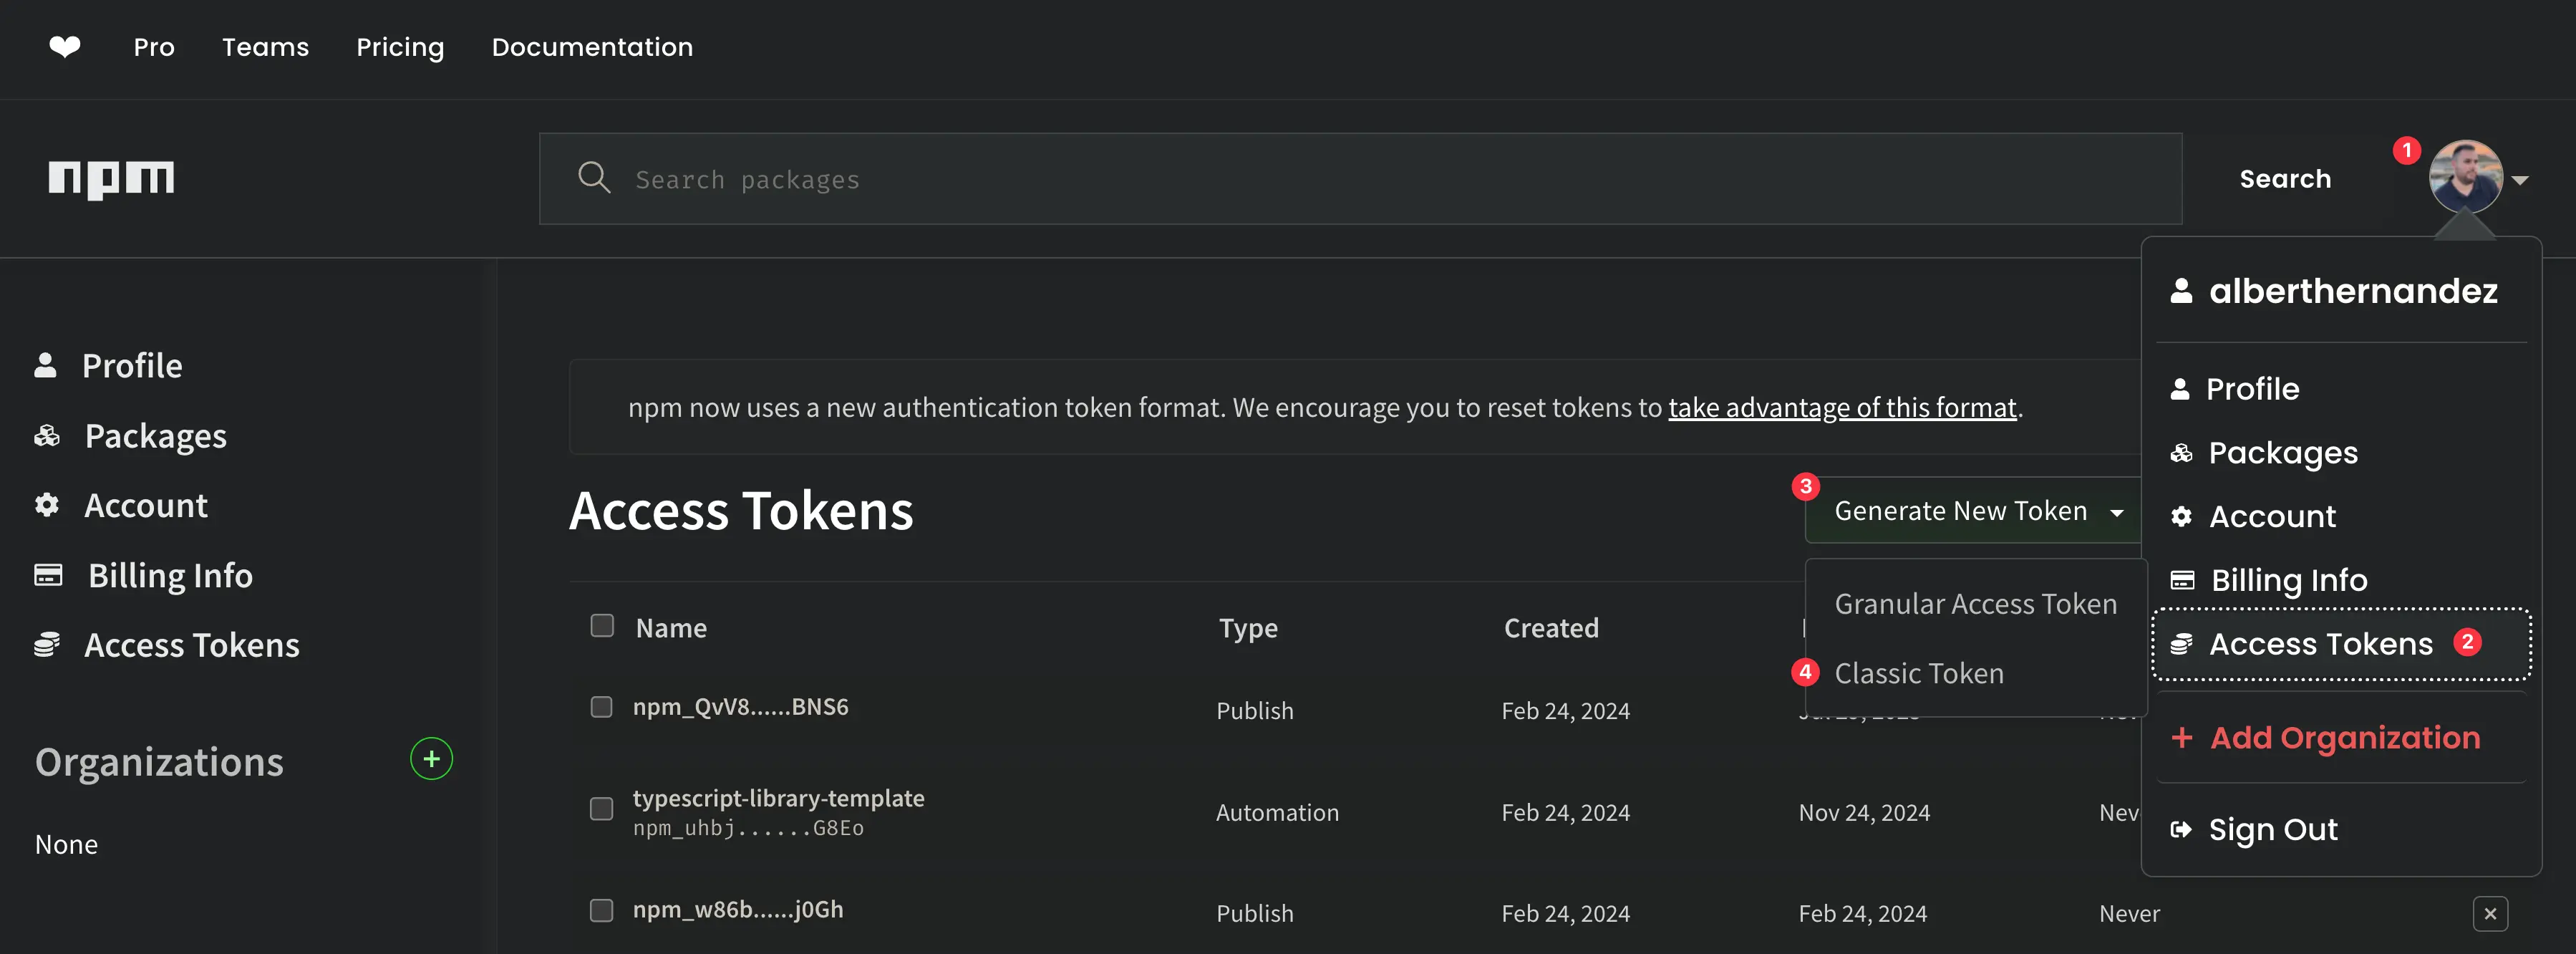
If you don’t have an account on npm, you’ll need to create one first. Once you’re logged in, follow these steps:
- 👤 Click on your profile picture in the top right corner.
- 🛡️ Select Access Tokens from the dropdown menu.
- ➕ Click the Generate New Token button.
- 🔘 Choose Classic Token from the options that appear.
After that, a window will open where you can:
- ✏️ Give your token a name (something like
ci-publish-tokenis fine). - ✅ Select the Automation type — this is important, as this type of token is specifically designed for use in CI/CD pipelines.
- 🚀 Finally, click Generate Token.
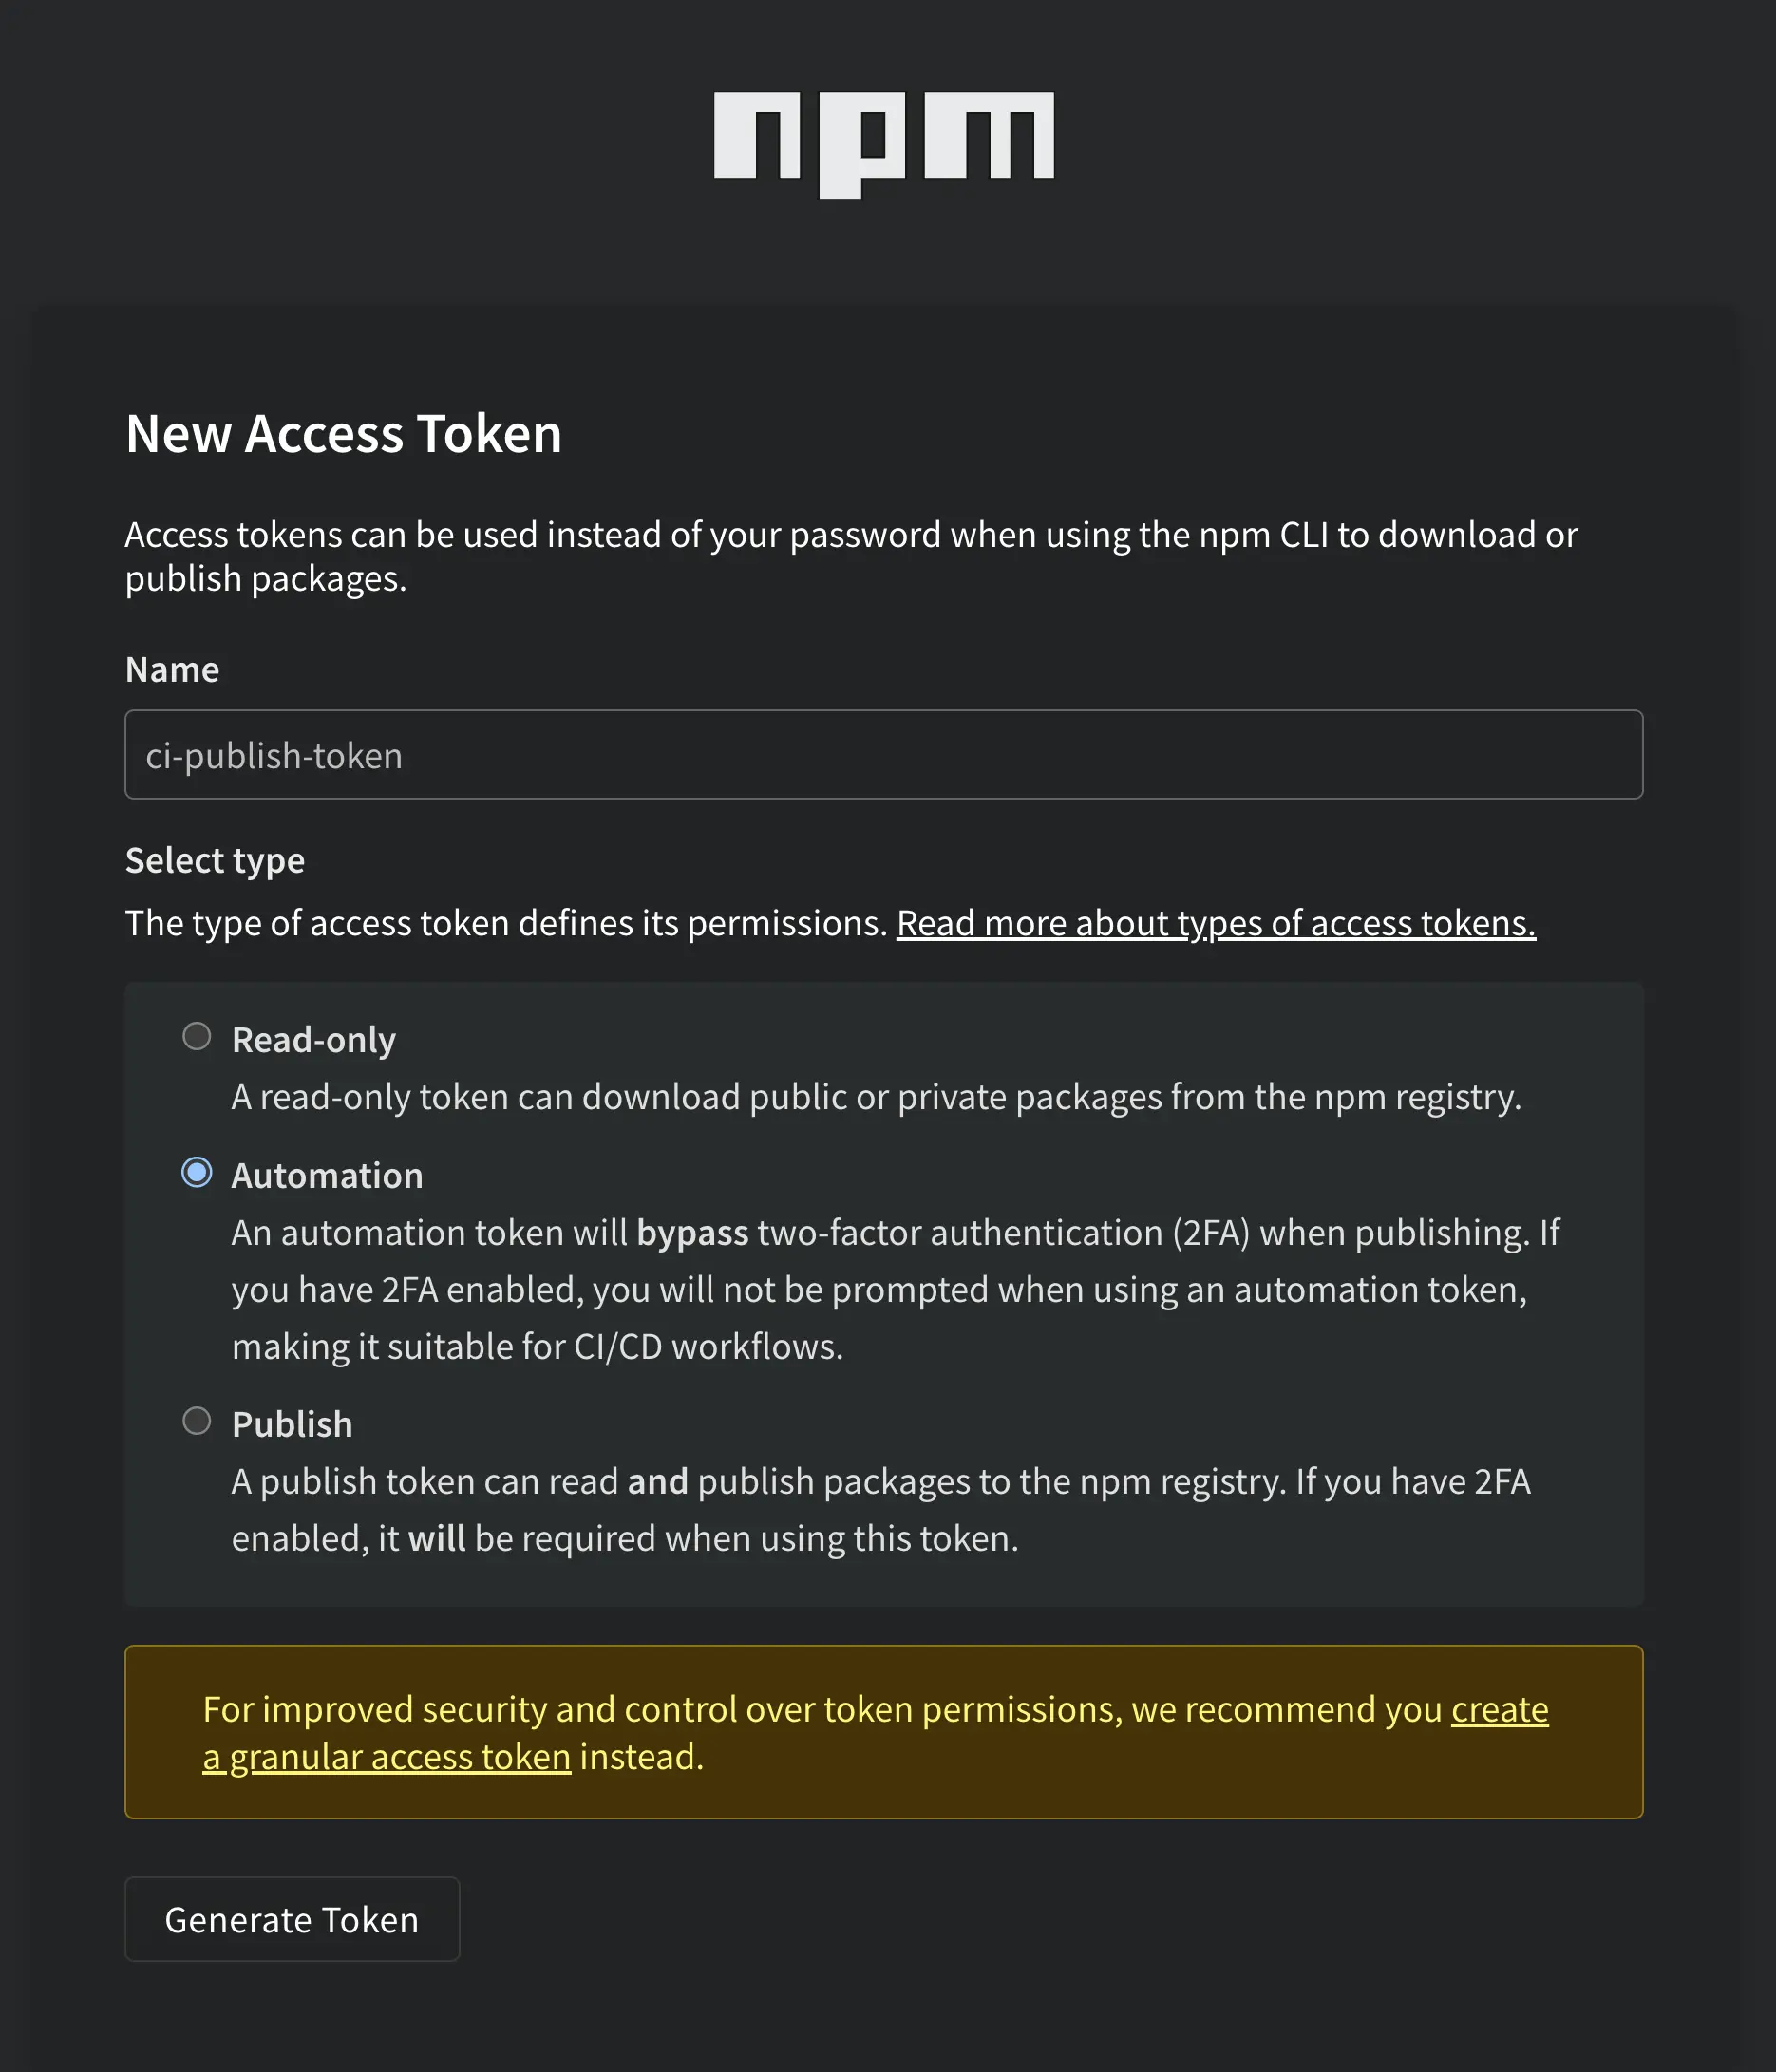
Once created, make sure to copy the token and save it — you won’t be able to see it again later!
🔐 Configuring GitHub Secrets
Now that we have our npm automation token, we need to add it as a GitHub secret so we can use it later in our CI workflows.
To do this:
- Go to your repository on GitHub.
- Click on the Settings tab.
- In the left sidebar, scroll down to Secrets and variables and click on Actions.
- Then click the New repository secret button.
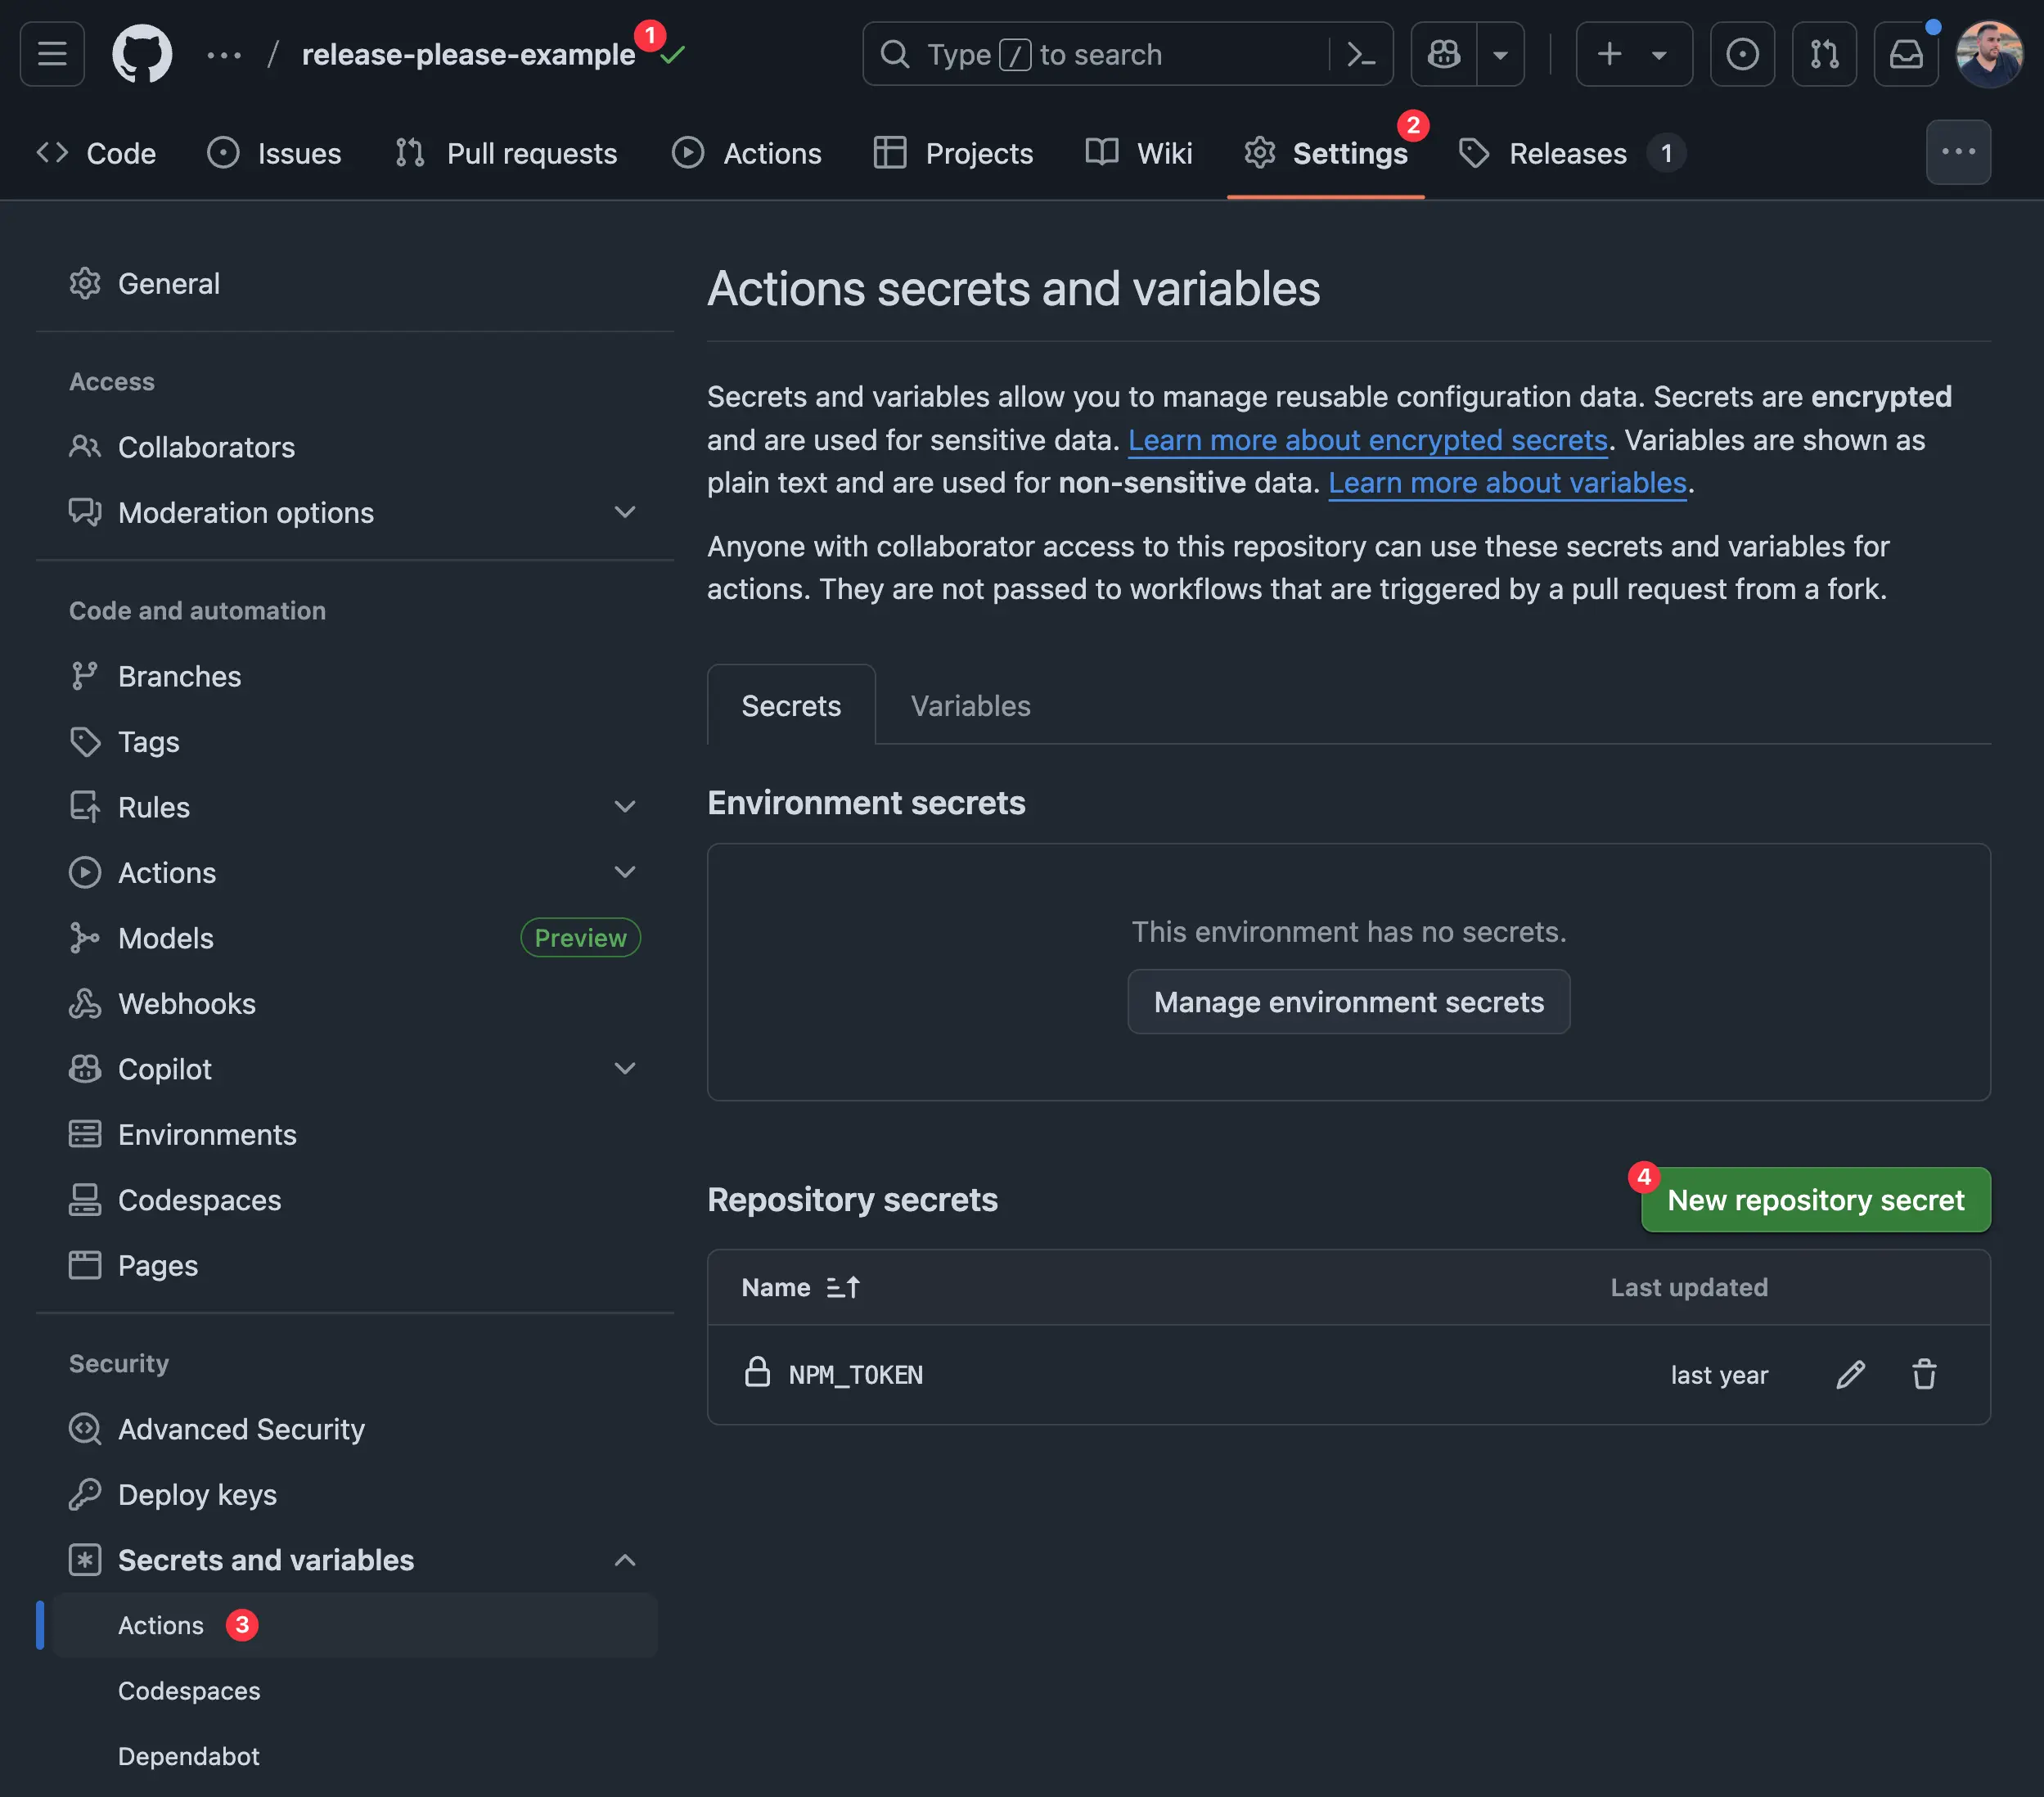
Once you're in the form:
- Set the Name of the secret as
NPM_TOKEN. - Paste the value using the token you generated earlier on npm.
This secret will be available in your GitHub Actions workflows as an environment variable. It’s safe and encrypted.
🧩 Enabling Squash Merges
To get the best results from release-please, it’s recommended to use squash merges when merging pull requests.
This ensures that each PR becomes a single commit with a clear, consistent message — perfect for tools that rely on Conventional Commits.
To enable squash merging:
- Click the Settings tab.
- Inside the General section, scroll down to the Pull Requests section.
- Check the box Allow squash merging.
- In the Default commit message dropdown, select Pull request title.

✅ Granting GitHub Actions Permission to Create Pull Requests
For release-please to work correctly, GitHub Actions needs permission to create pull requests in your repository.
To give it the right permissions:
- On the left sidebar, go to Code and automation.
- Click on Actions to open the dropdown menu.
- Click on the General option.
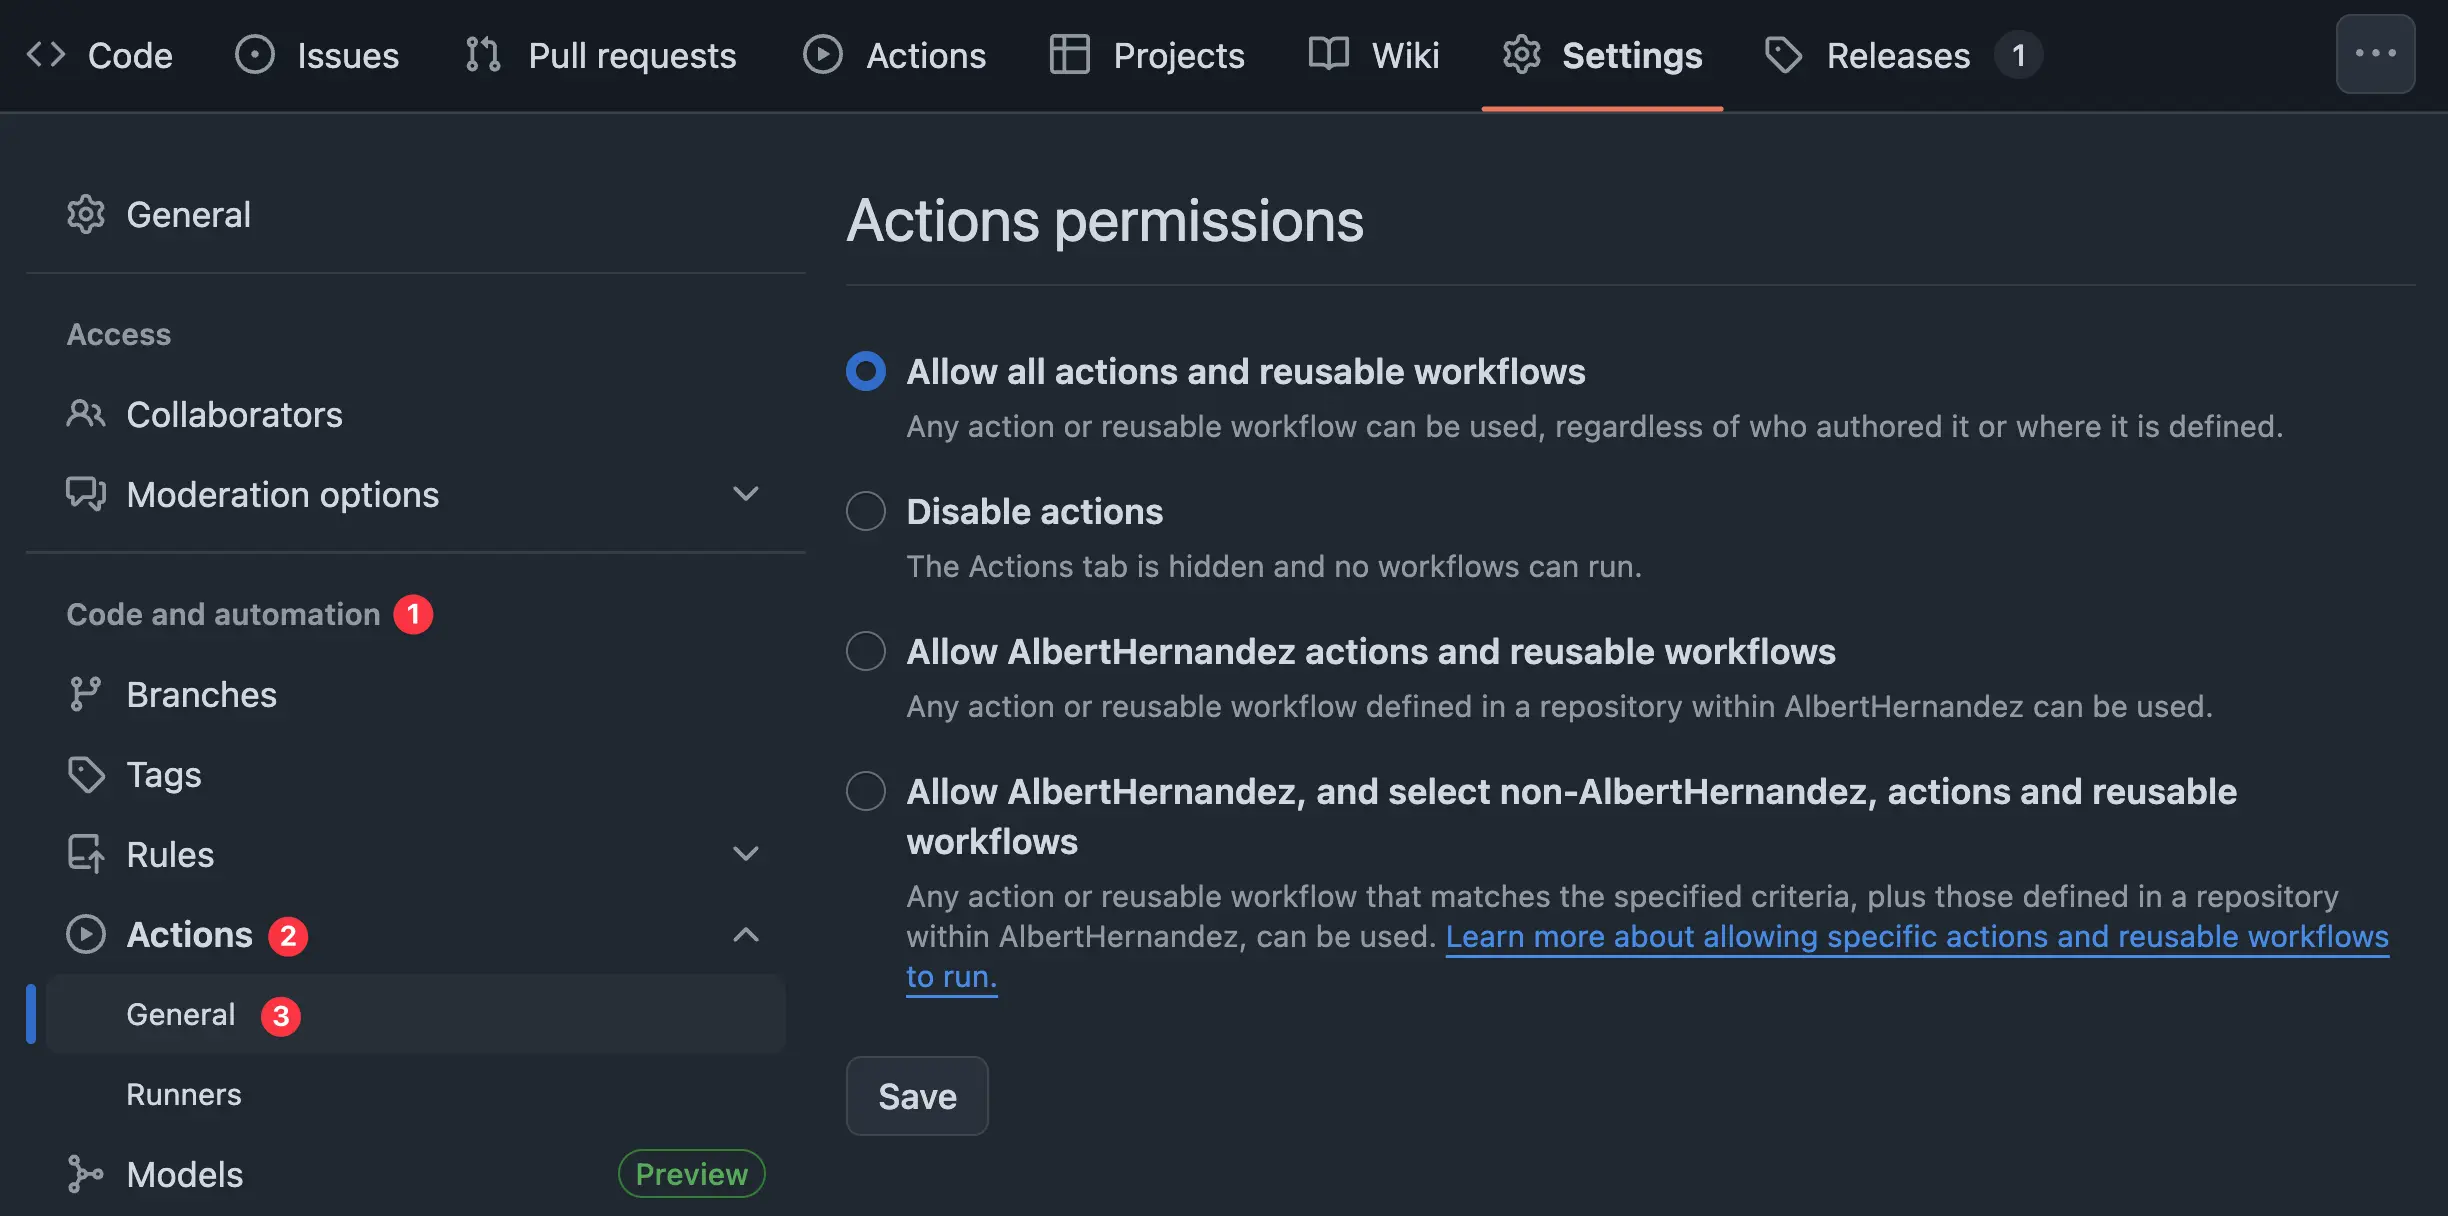
- Scroll down to the Workflow permissions section.
- Select the option Allow GitHub Actions to create and approve pull requests.
- Click the Save button.
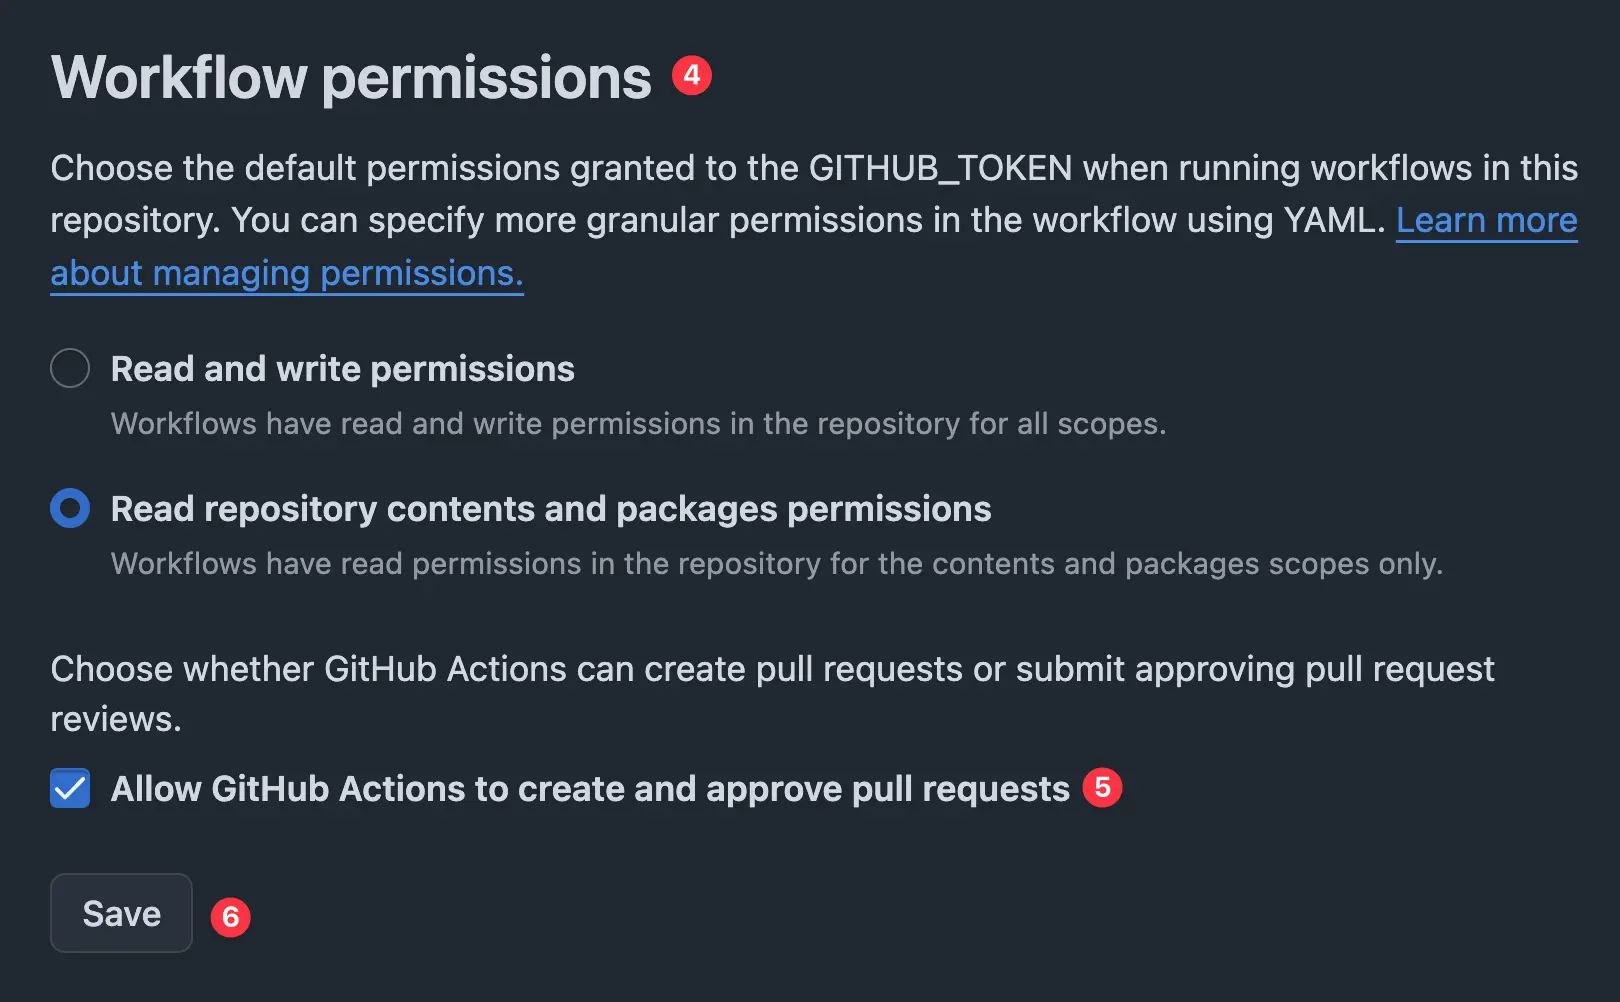
This ensures release-please can open pull requests automatically when it detects changes — like a new feature or bugfix — and suggest a release.
🤖 Setting Up the Release Workflow with GitHub Actions
Now that we have everything prepared, it’s time to create the actual GitHub Actions workflow that will automate our releases using release-please.
Since we’re already using GitHub, we’ll take advantage of the official release-please GitHub Action. This wraps the CLI in a GitHub Action and makes the whole setup even easier 🚀.
Let's create a new file in our repository at .github/workflows/release-please.yml with the following content:
At this point, we've set up the basic part for release-please to work inside GitHub Actions. But before we publish our package to npm, there's another useful improvement we can add.
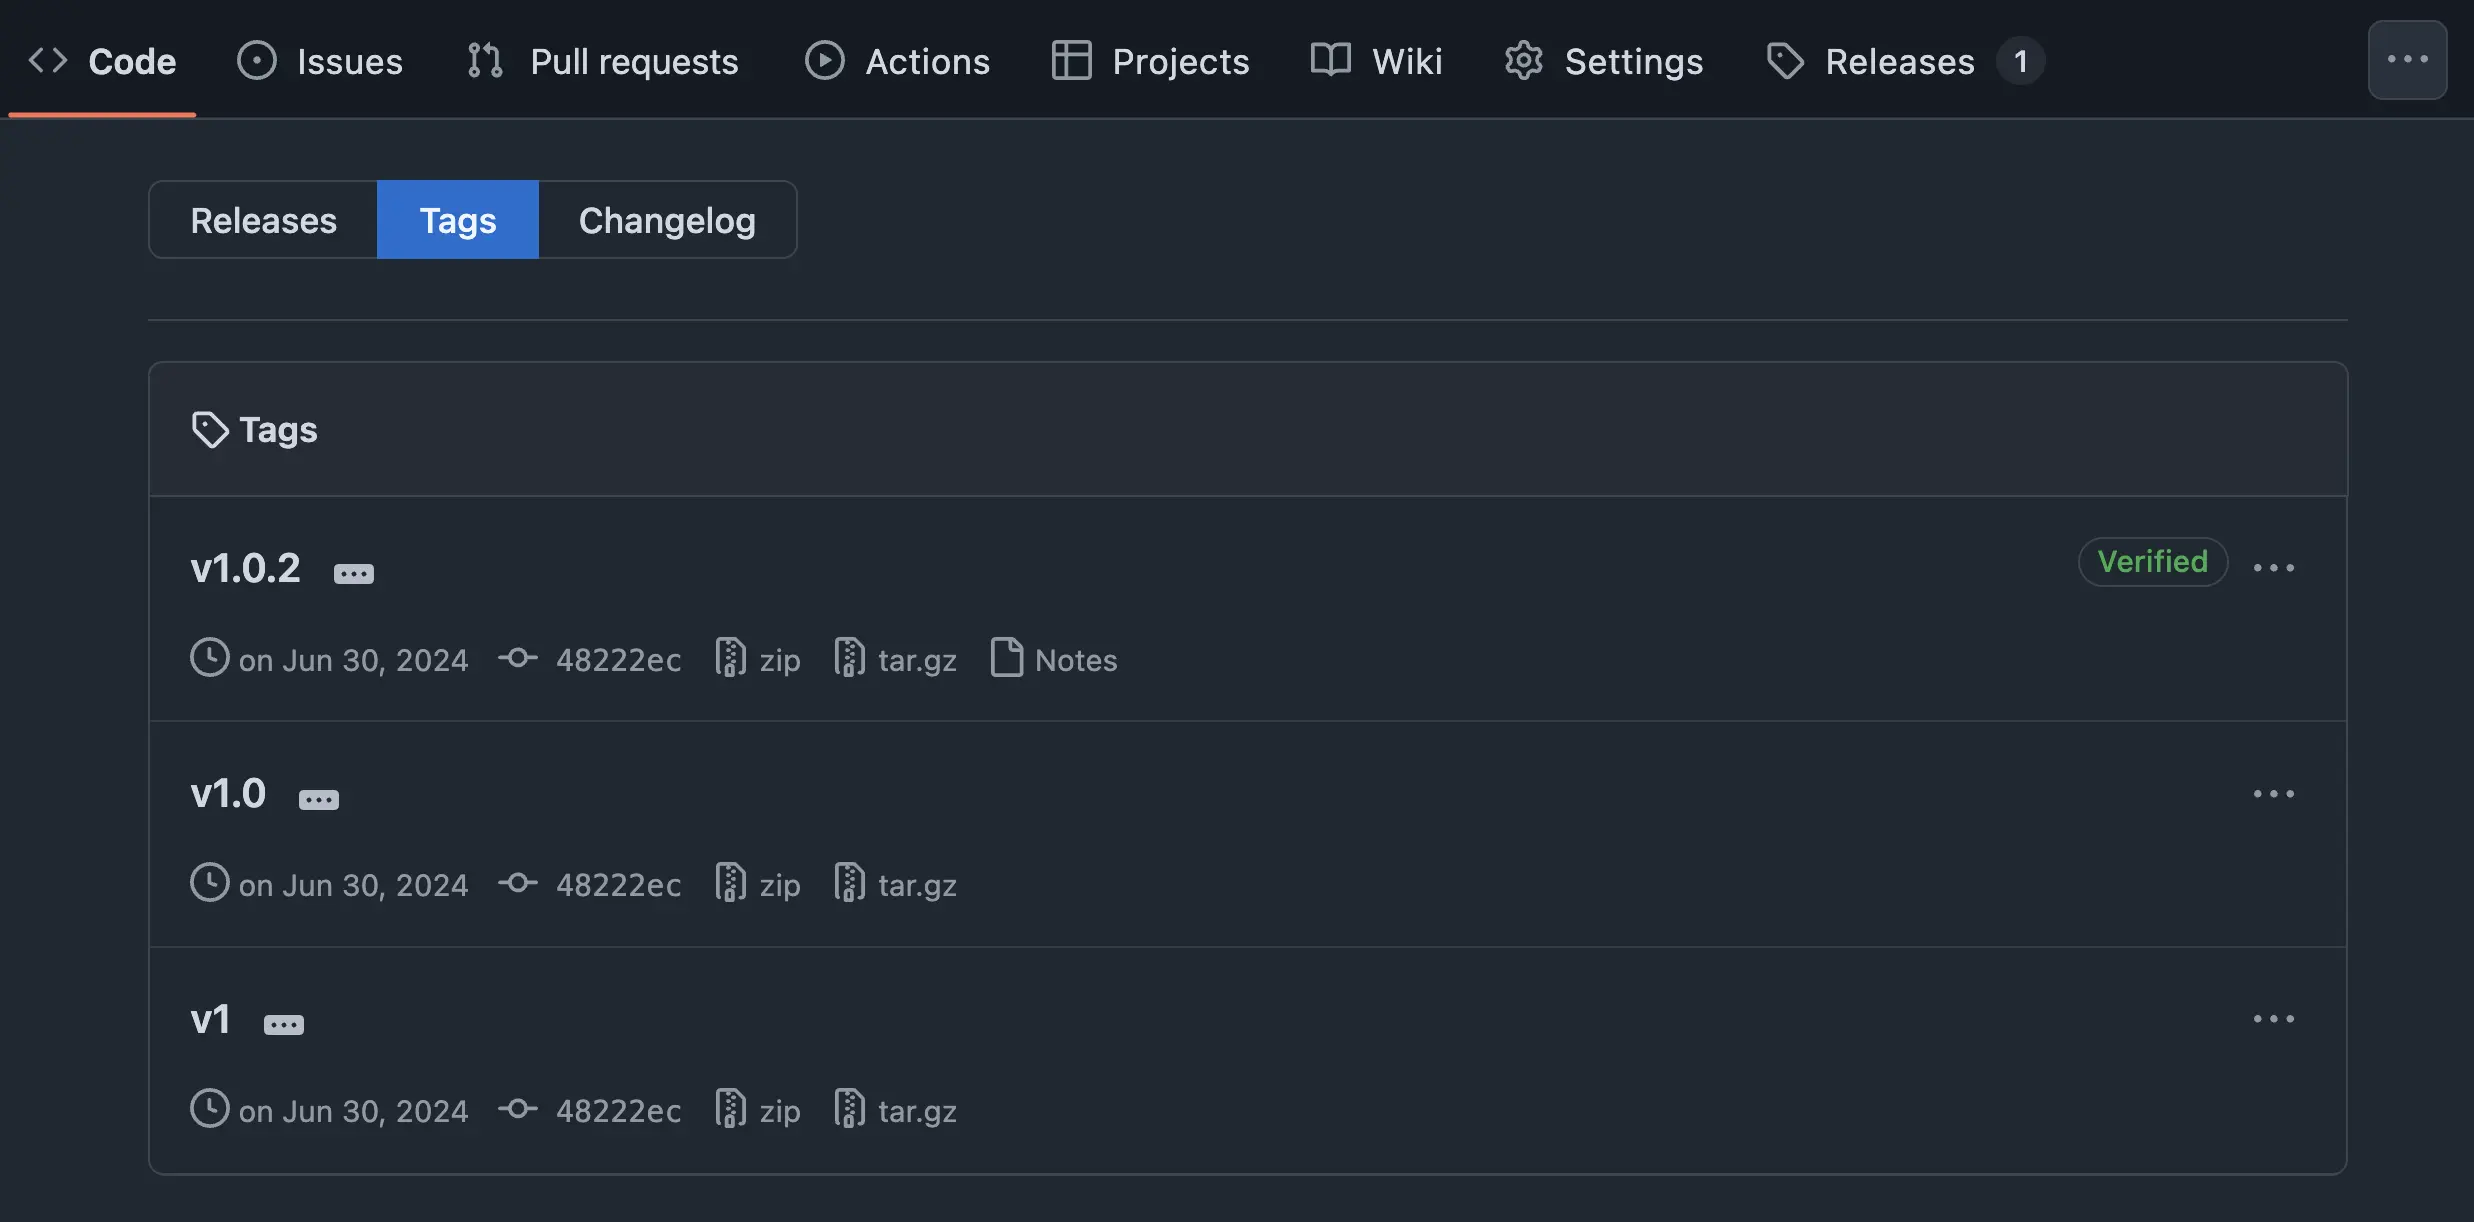
By default, release-please only creates a tag for the exact version (like v1.0.2). It does not create or update simpler tags like:
v1(which points to the latest major version)v1.0(which points to the latest minor version within that major)
These extra tags are very useful. They help people easily get the latest stable version of a specific major or minor release line.
To add these extra tags, we'll add a new step to our GitHub Actions workflow:
The last part of our setup is to publish the package to npm whenever a new release is created.
To do that, we just need to add a few more steps to our GitHub Actions workflow:
With everything we've set up so far, we now have a complete and automated release setup using release-please!
🤩 How Does the Release Process Work?
Now that we have our release workflow set up, let's see it in action, step by step.
1. 👷♂️ Create a new branch
First, you start by creating a new branch from your main branch (or whatever your main development branch is called). On this new branch, you will add your new feature, fix a bug, or make any other changes.
2. 📝 Open a Pull Request with a Conventional Commit Title
This step is very important:
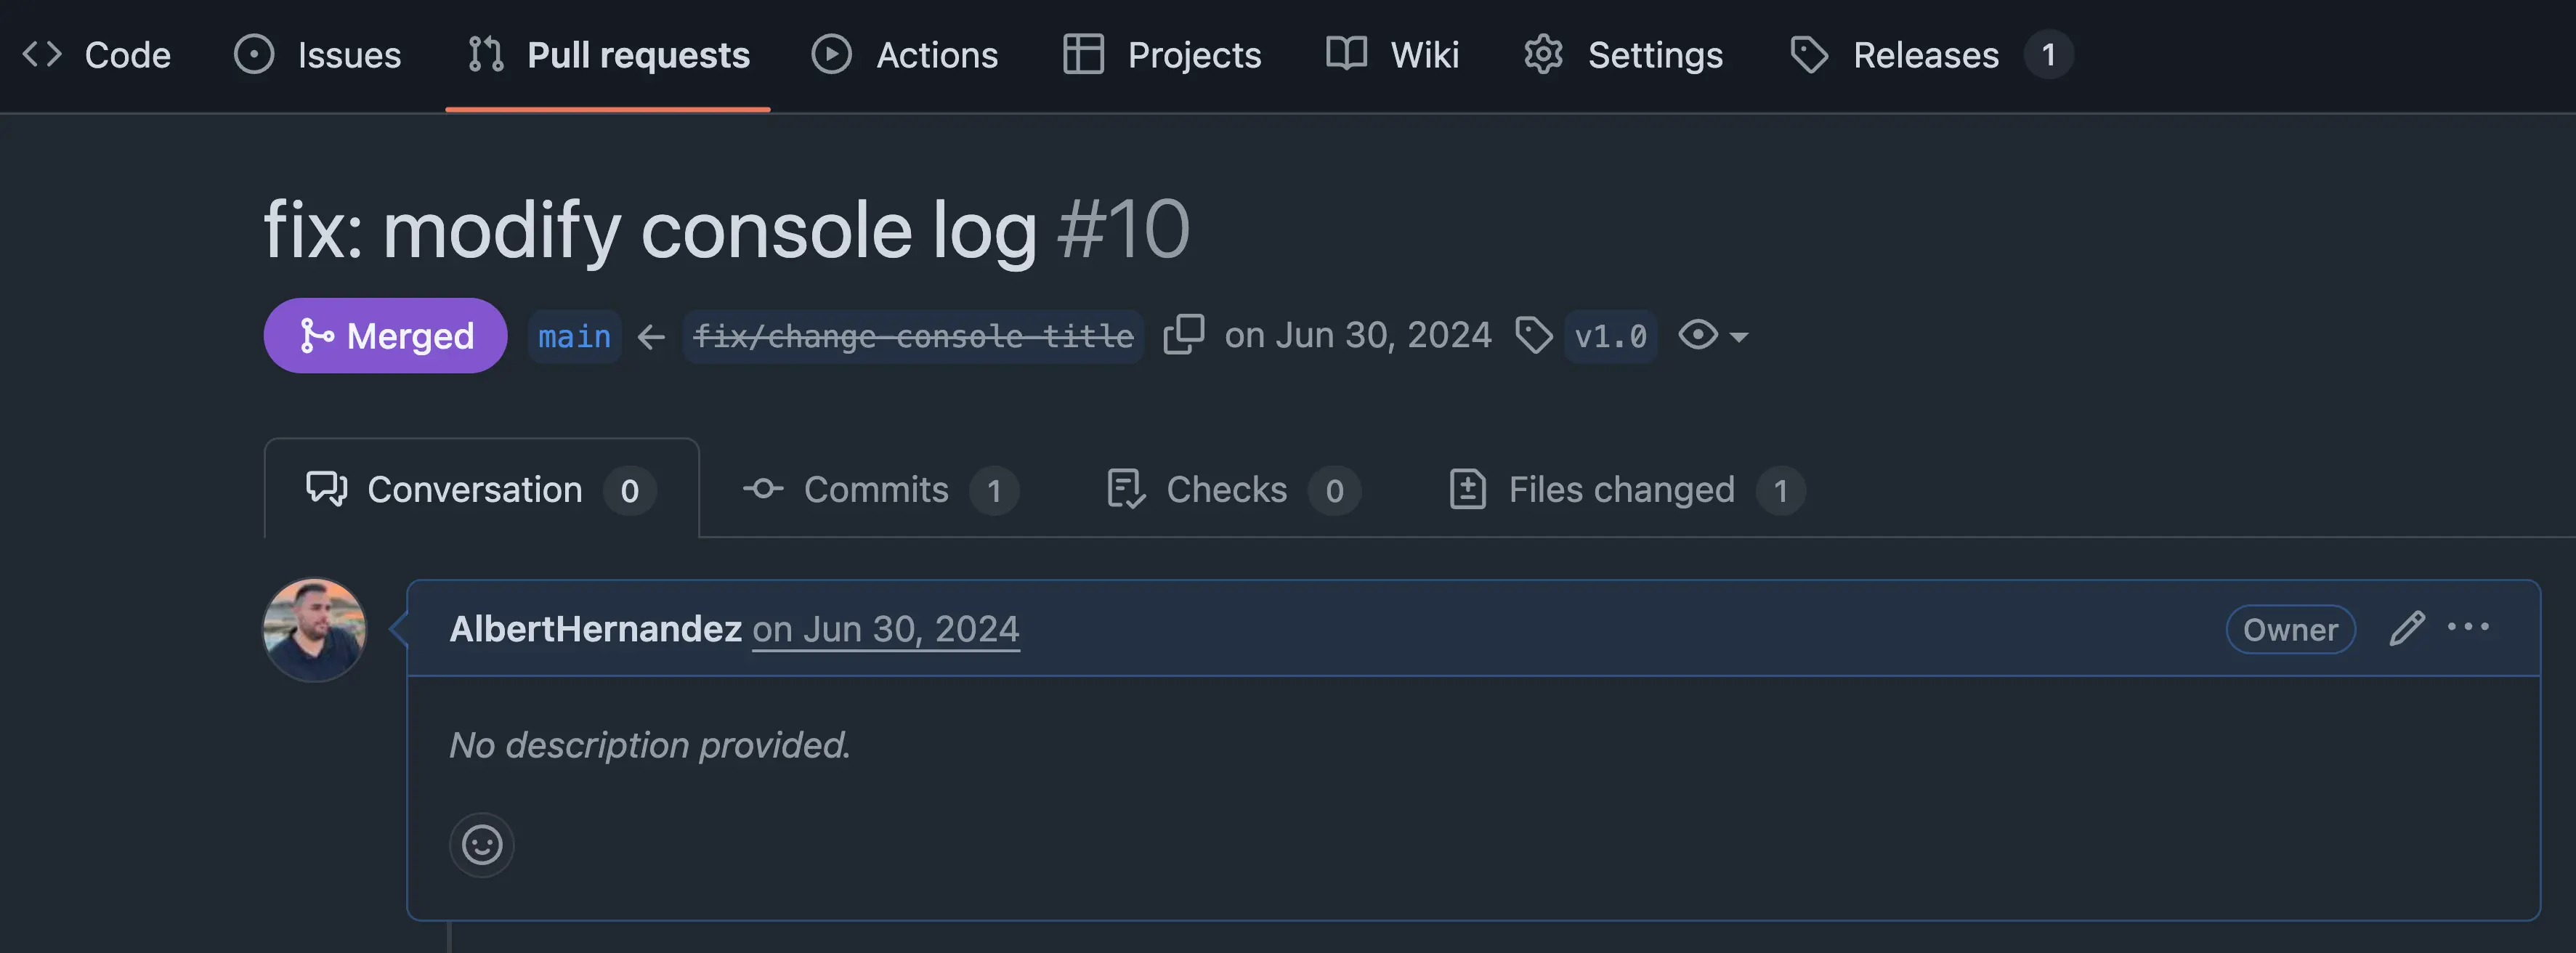
- 👉 The title of your Pull Request (PR) will become the final commit message when you merge the PR using the "squash and merge" option.
- 💡 This commit message is exactly what release-please uses to decide if it should create a new release, and what kind of release it should be (a small
patchfix, aminorfeature, or amajorbreaking change). - It does not matter if your PR has many small commits inside it; only the PR title matters for release-please.
💡 Tip: Want to make sure your pull request titles always follow Conventional Commits? Use this GitHub Action to automatically check your PR titles. It helps prevent mistakes and keeps your release automation reliable! ✅
3. ✅ Merge the Pull Request
Once your pull request is reviewed and ready, you can merge it into your main branch. Make sure to use the "squash and merge" option. This will combine all your PR's commits into a single, clean commit on main, using your PR title as the commit message.
4. 🎯 Release-Please Creates automatically a New Pull Request
After you merge your PR, release-please will start working automatically. It will then create a new pull request for you, like this example:
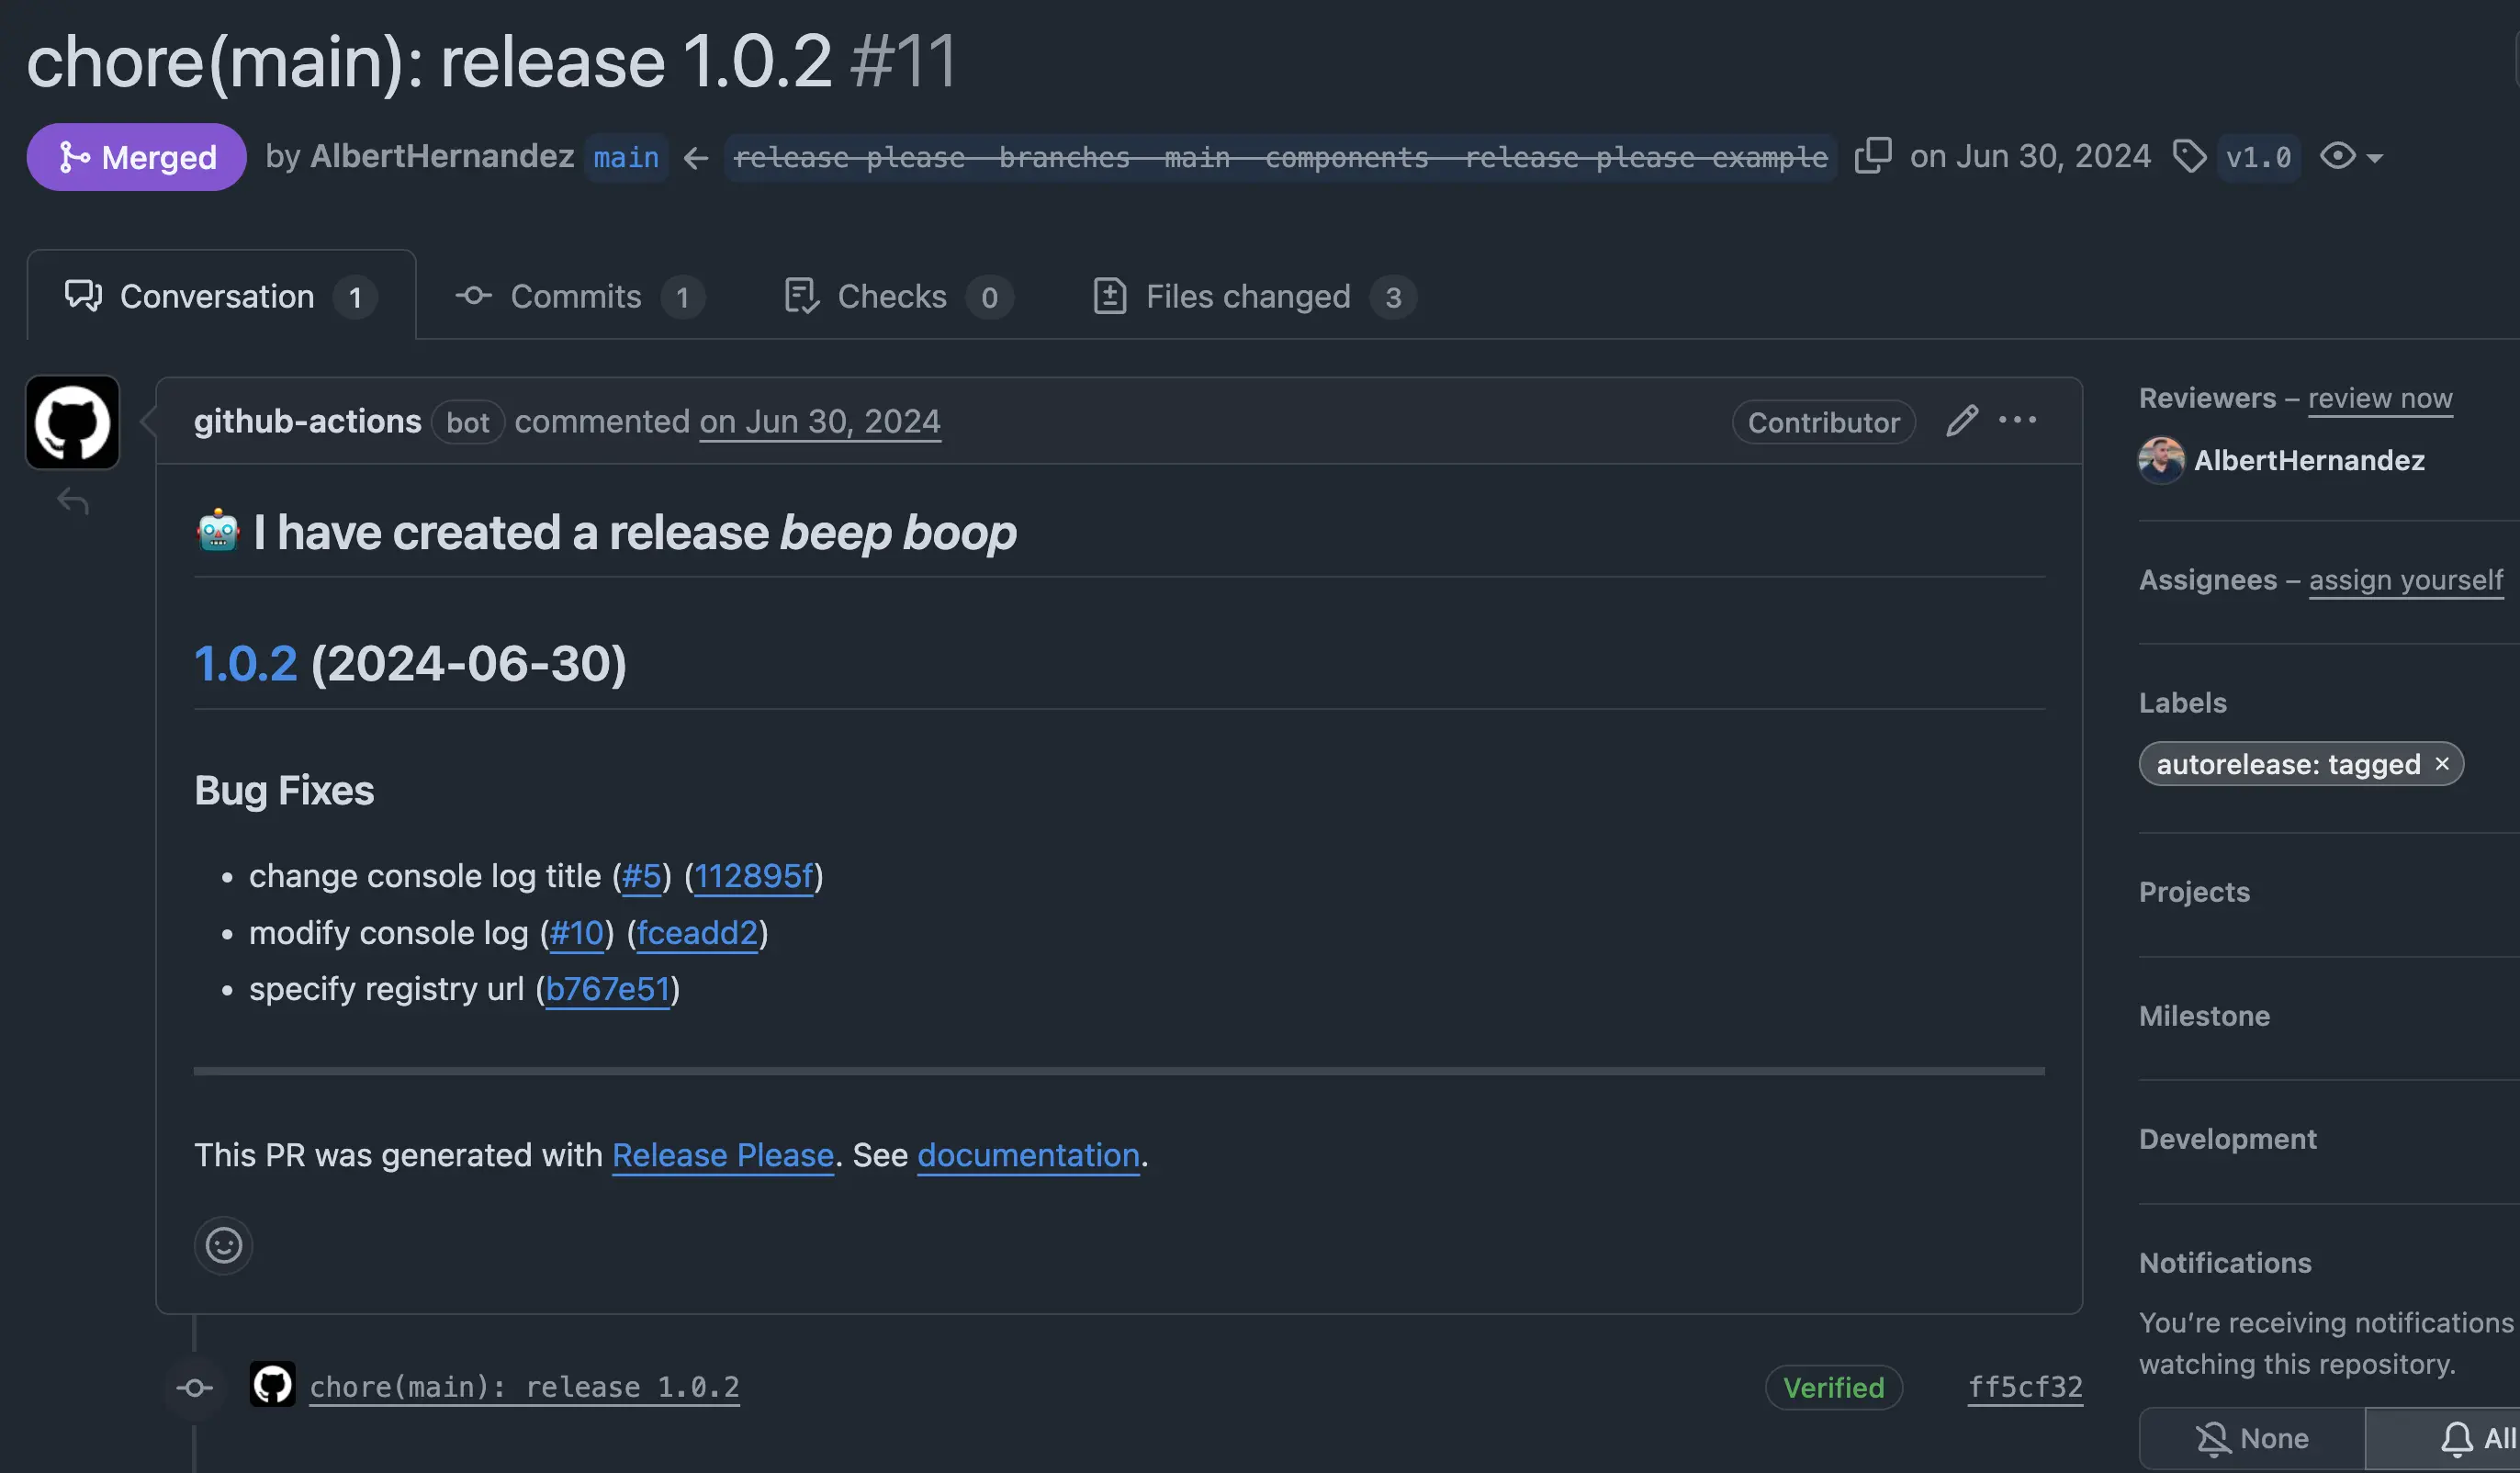
In this new pull request, you'll see that a release for a new version (e.g., 1.0.2) is ready. For example, if your previous version was 1.0.1 and your merged PR included a fix commit, release-please will automatically detect that it needs to bump the patch version to 1.0.2.
The description of this PR will list all the changes that will be included in this release – new features, bug fixes, and more.
If you look at the "Files changed" in this PR, you'll see that release-please has automatically generated a changelog with all the new changes. It even links these changes back to the original PRs, using the commit messages that followed Conventional Commits (like feat, fix, etc.).
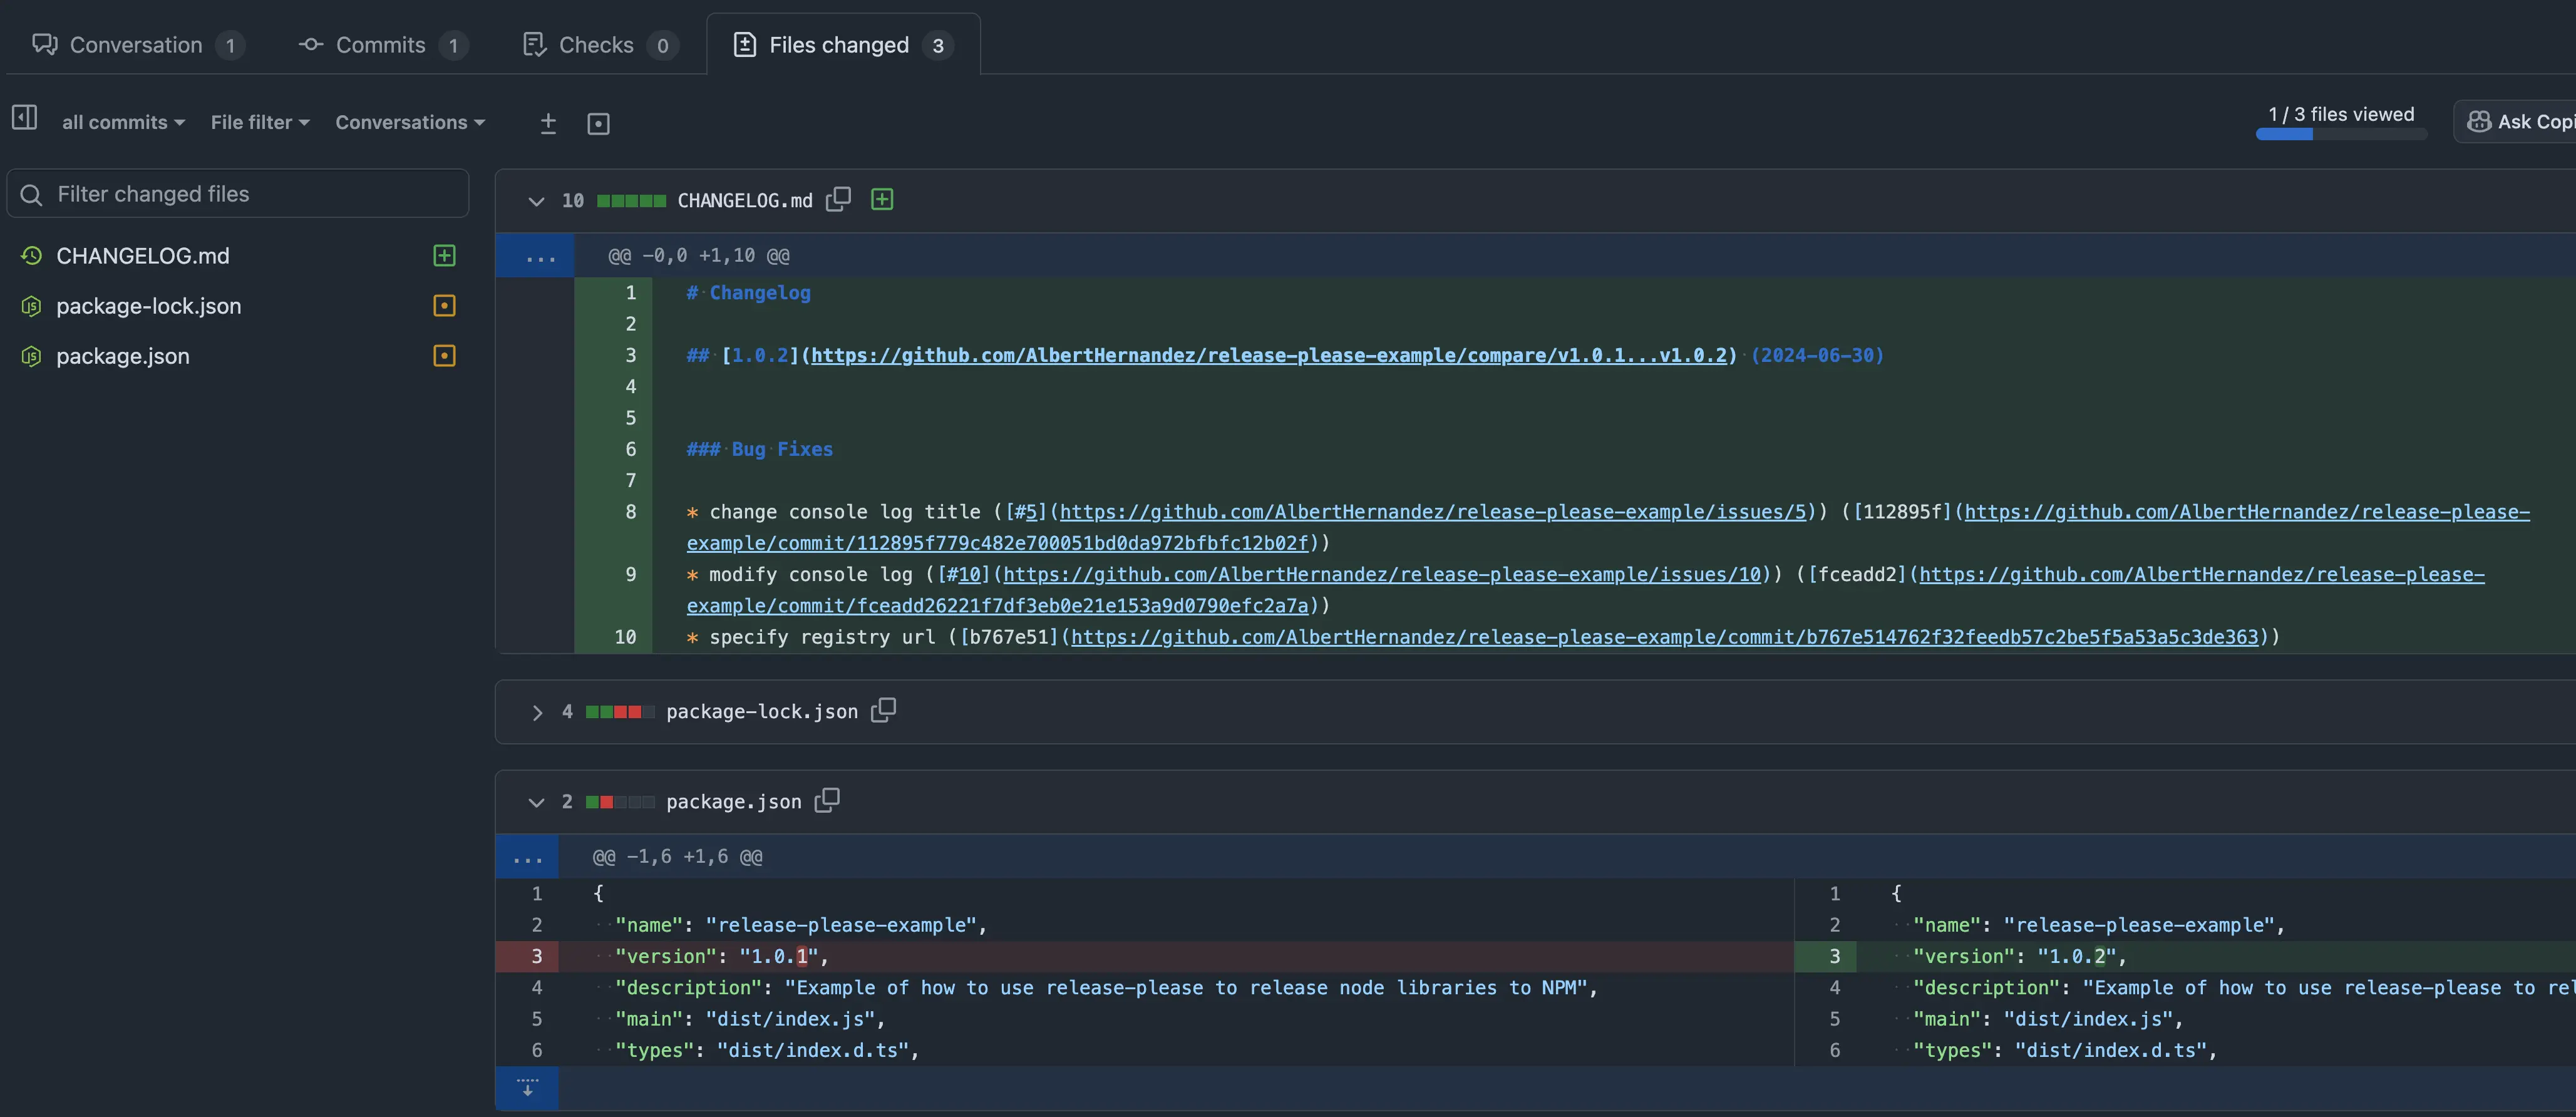
Also, because we configured it for a Node.js project, release-please has automatically updated the version numbers in your package.json and package-lock.json files. If you were using other languages like Python or Ruby, it would update their specific version files.
Note
If you don't merge this release pull request right away and continue merging other pull requests to main, release-please will automatically update the existing release PR. It will add all the new changes that are waiting to be released, always following semantic versioning rules. This way, your release PR always stays up-to-date with everything that needs to be included in the next version.
5. 🚀 Review and Merge the Release Pull Request
Finally, you can review the release pull request created by release-please. Check if everything looks correct. If it does, you can merge it into your main branch.
Once merged, here's what happens automatically:
- GitHub Tags will be created or updated for your new release. This includes the major (
v1) and minor (v1.0) tags we configured earlier, pointing to your latest release.
- A GitHub Release will also be created automatically, with all the release notes.
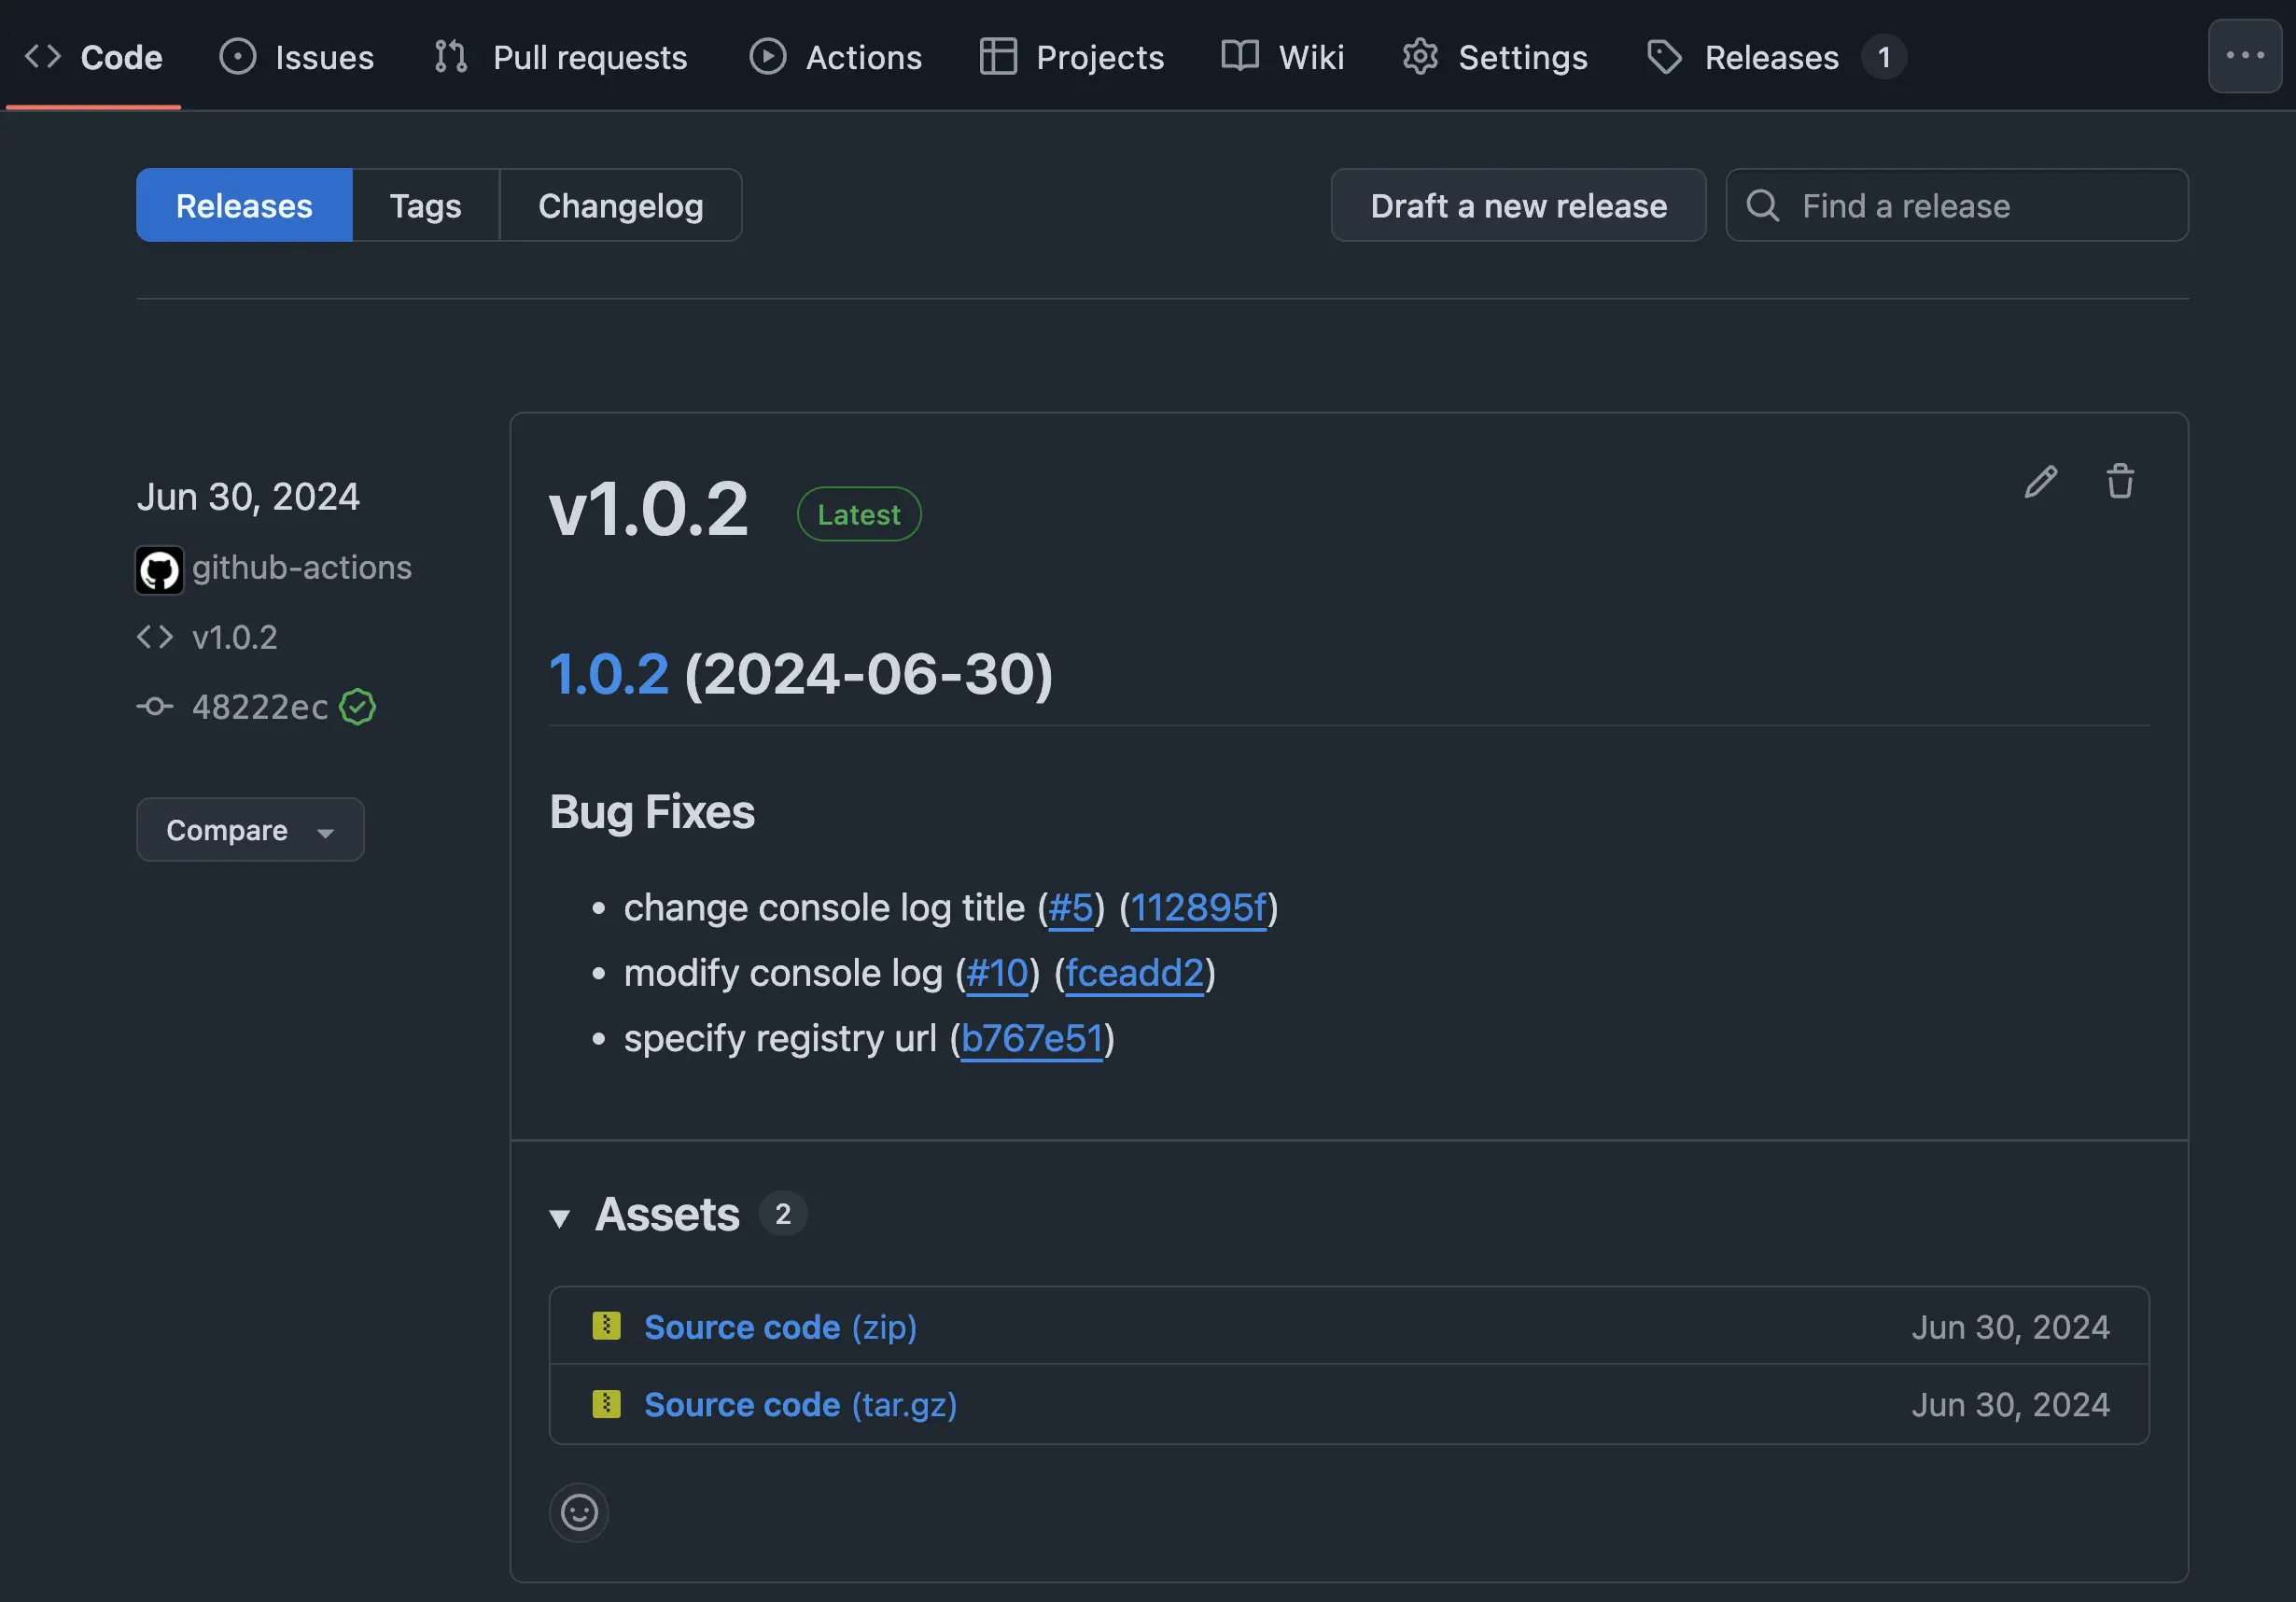
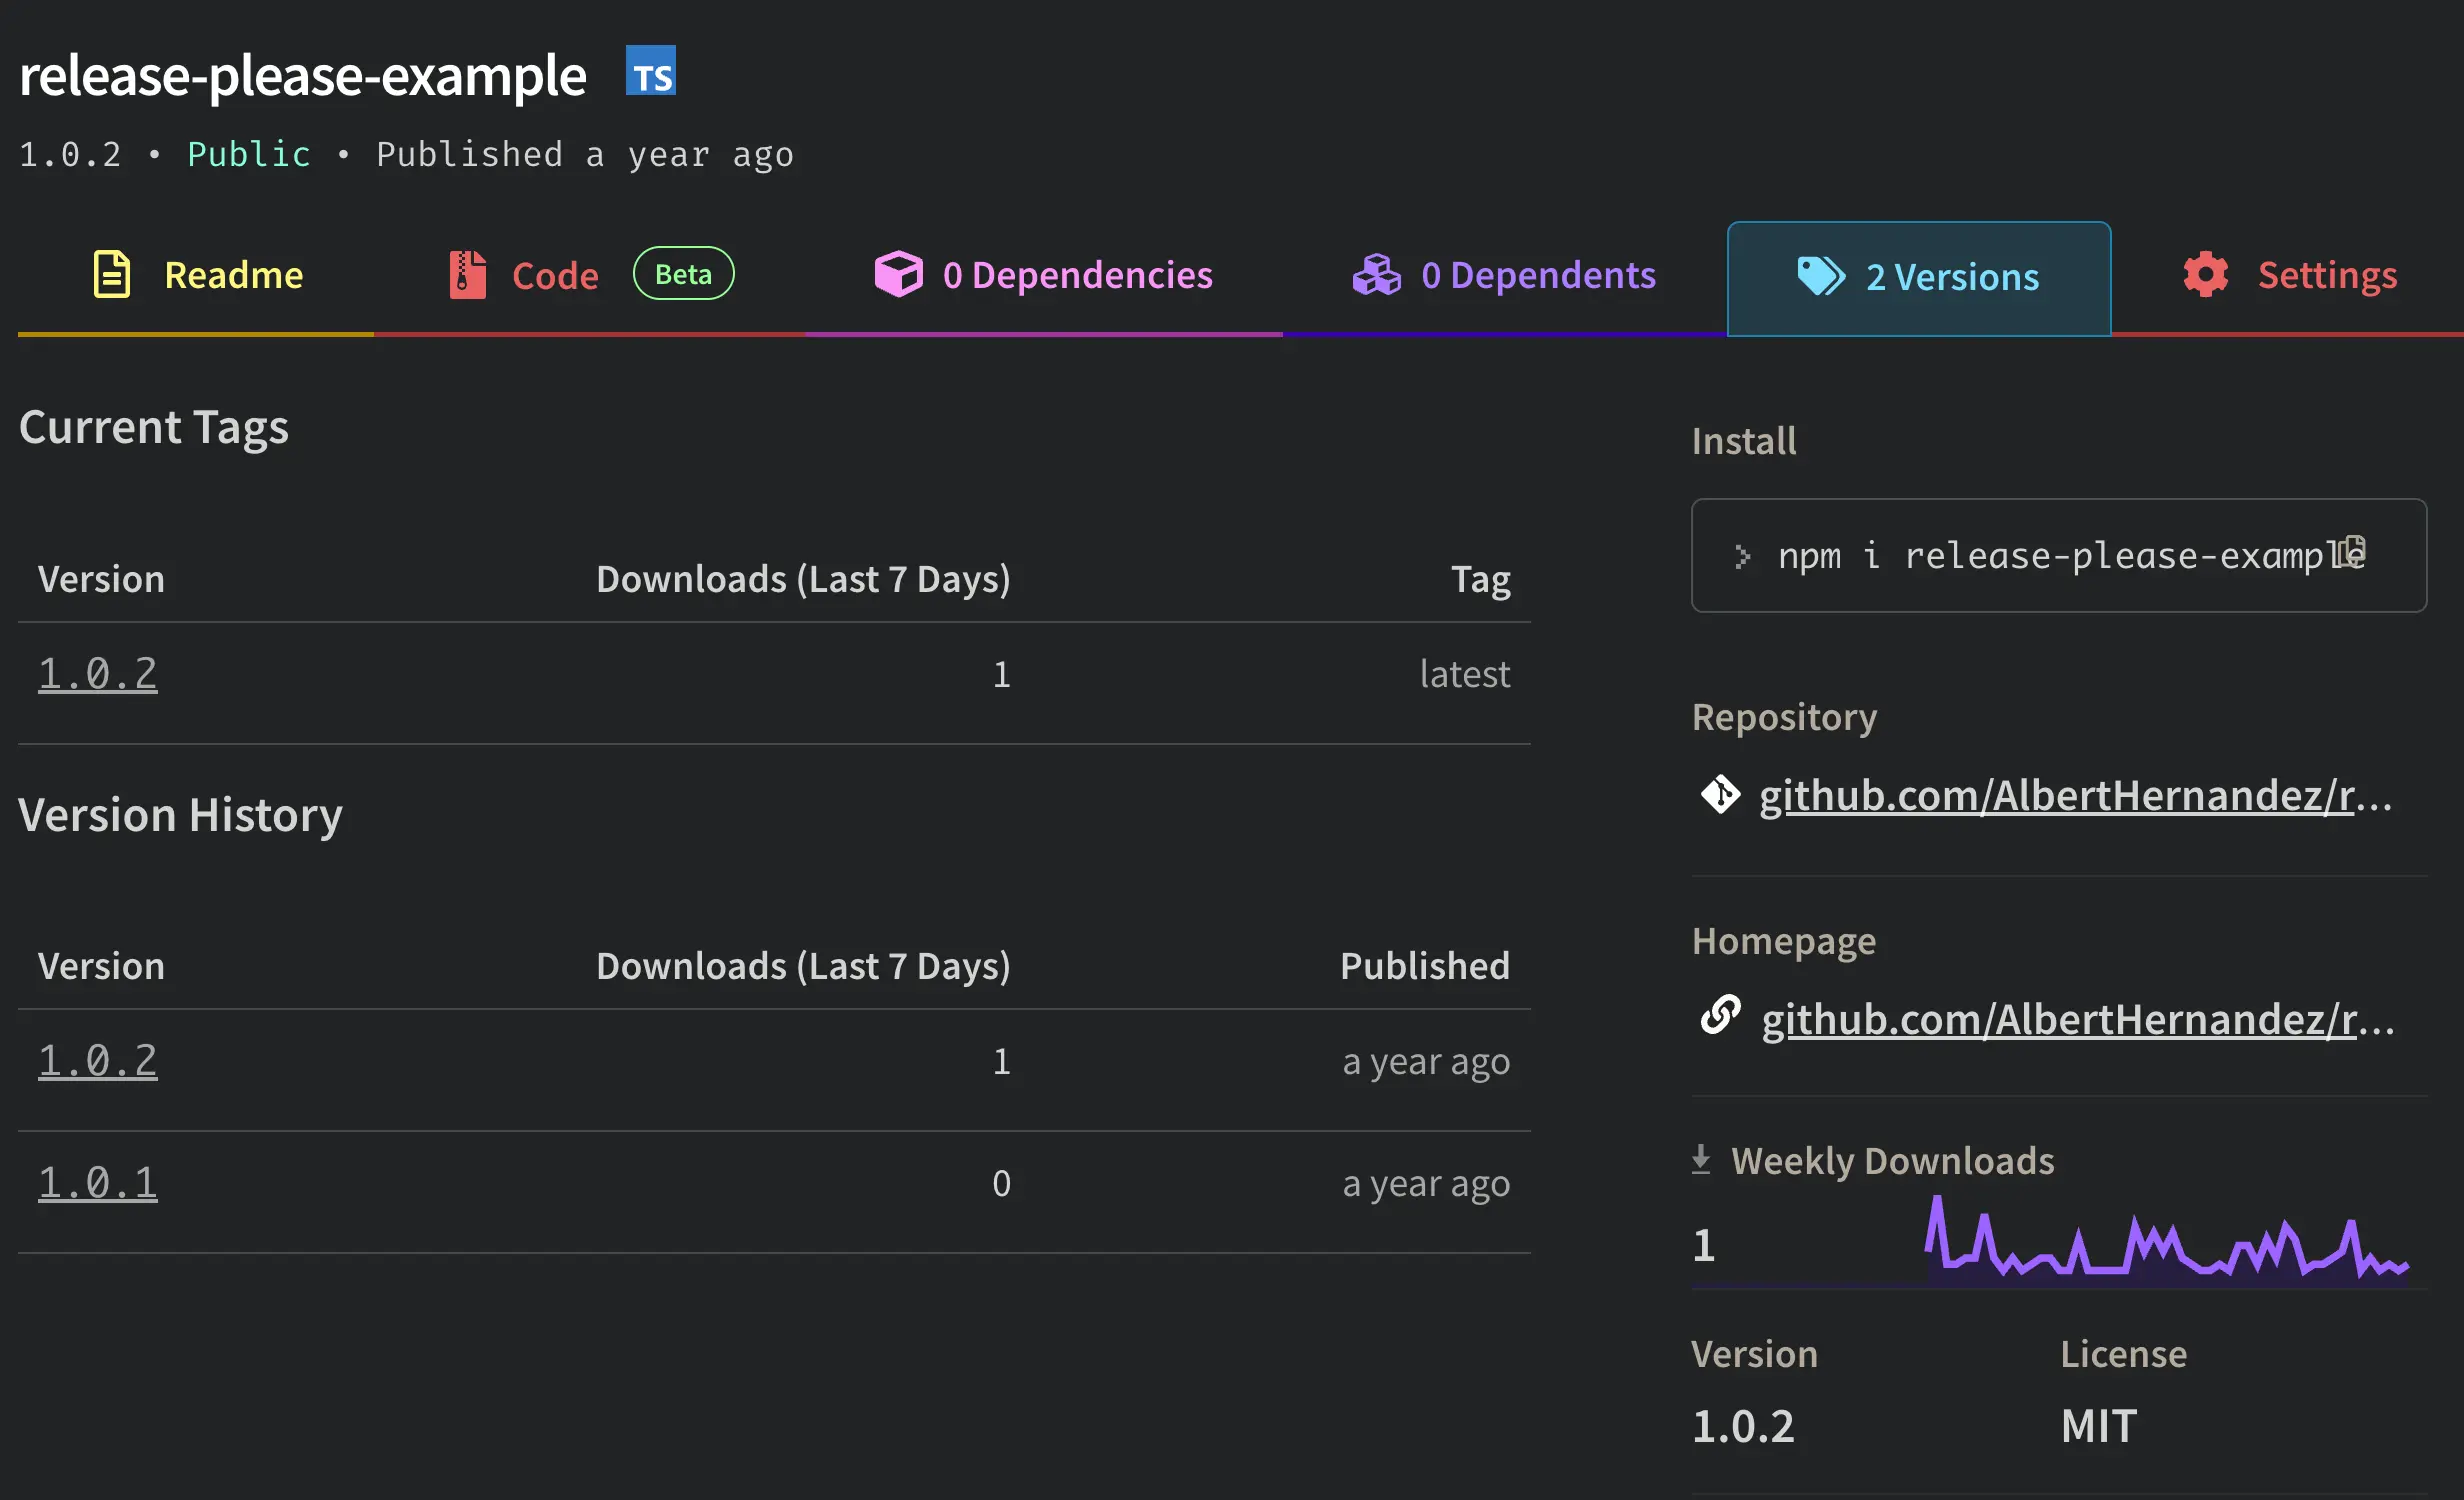
- The new version will be published to npm automatically, so anyone can install it right away.
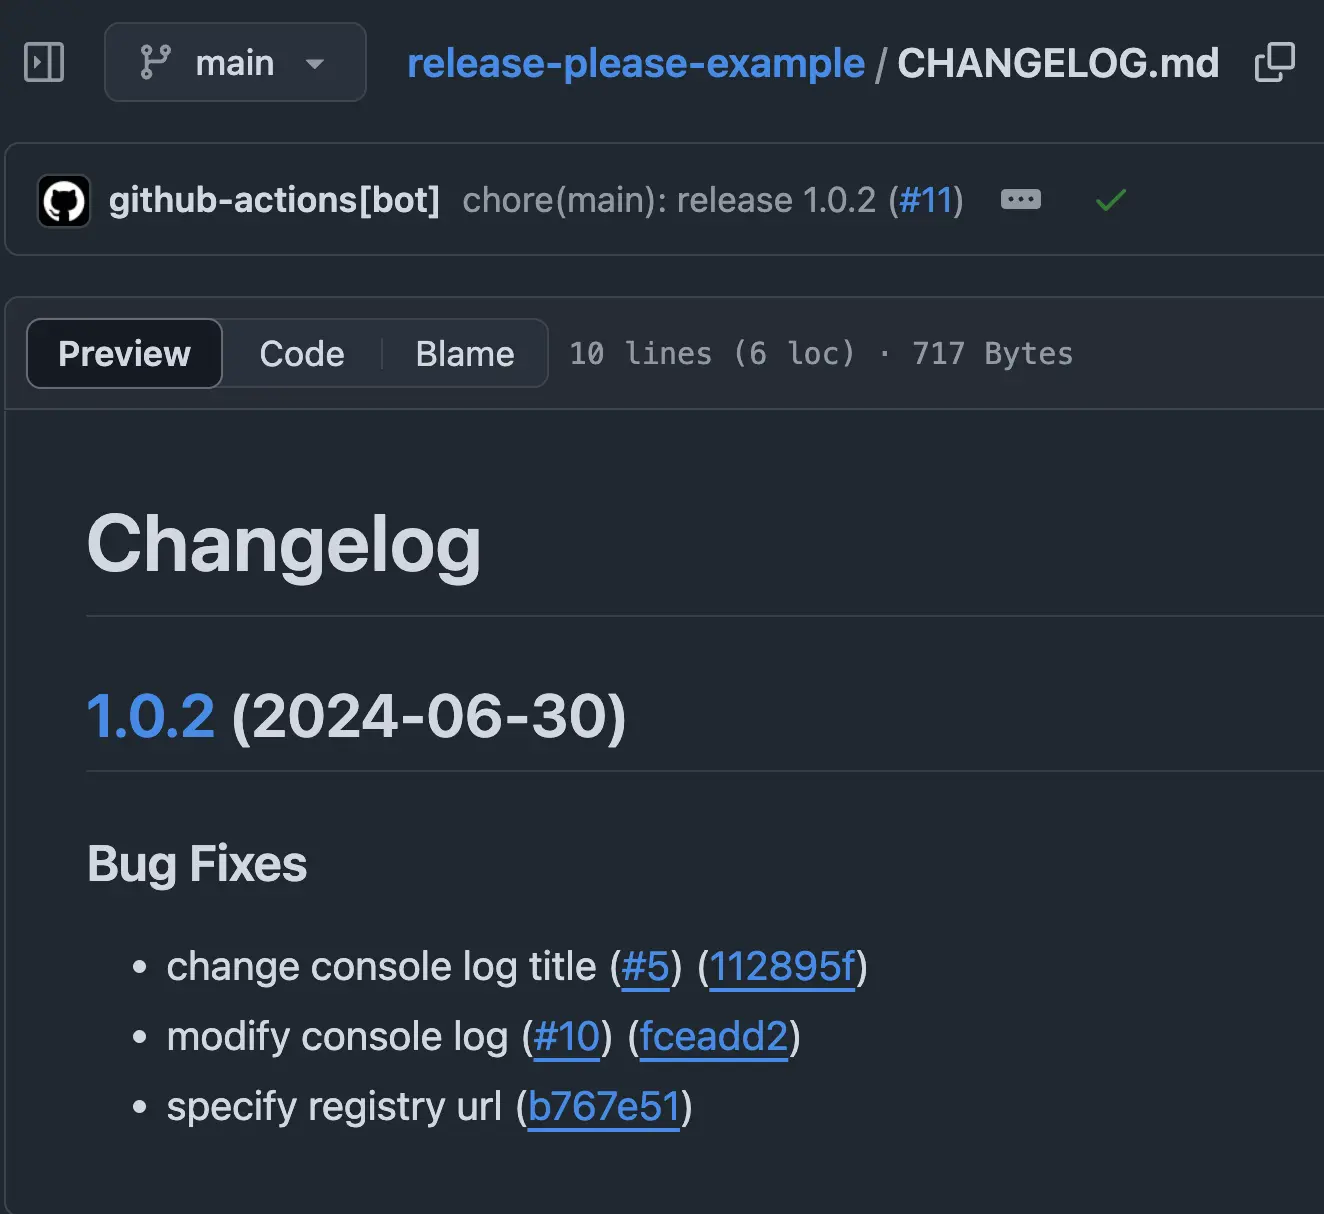
- And of course, your
CHANGELOG.mdfile will be updated with all the new changes from this release, just as you saw in the release PR.
This entire process, from your code change to a published release, is now fully automated!
🤝 Conclusions
As you've seen, setting up release-please is surprisingly easy. With just a little bit of setup and by using Conventional Commits, we have automated a process that used to be very manual and often led to mistakes.
Now, you no longer need to worry about manually doing all the steps involved in releasing a new version. All these steps are handled automatically once you merge a Pull Request with the correct commit message format.
This guide has shown you how to make your release workflow much smoother and more reliable.
Thank you so much for reading! 🙌